NS - Knowledgebase
Find the answers you need. More articles every week.
| ID | Title | Module | Category |
|---|---|---|---|
| 14 |
Getting Started with OfficeProGetting Started with OfficePro Welcome to NaturaeSoftYour solution for success! The OfficePro suite gives your practice the benefits of increased efficiency, an enhanced professional image, and an integration of all of the major systems inherent to successful practices. We are excited to be able to support the success of your practice! Thank you for choosing NaturaeSoft! Getting StartedTo begin taking advantage of this powerful tool you will need to configure the system to match the specifics of how you practice. Use the following configuration outline to help you get your service set up. Once these steps are complete you can feel comfortable starting to use your service as your system will be configured to meet the specific needs of your unique practice. Configuration TrainingNaturaeSoft offers new customers a one-time configuration training that will help you to get your practice set up. We walk you through all facets of the Admin > General Settings page and help you get oriented to adding and managing, products, services, and diagnosis codes. This training can be scheduled by contacting Support @ NaturaeSoft.com and suggesting a couple of times during the week that would work well for your team. Once this meeting is scheduled we will send you a link with information about accessing the training session at the predesignated time.  Accessing your ServiceYour NaturaeSoft services are accessible from any computer anywhere on the Internet. That’s right! Macs and PCs can use our system and even UNIX-based workstations. All that you need is an Internet browser and an authorized account with our servers. OfficePro is a hosted service provided by NaturaeSoft. As a hosted service you do not need to maintain expensive hardware internally to access and manage your practice software. To set up a workstation with your OfficePro service, open your browser and go to: https://secure.naturaesoft.com. NaturaeSoft services are accessible through your Internet browser (Chrome, Safari, etc.). To log into your account, open your browser (Chrome or Safari are recommended) and go to: https://secure.naturaesoft.com or our alternative version accessed at https://officepro.naturaesoft.com.  Login to your practice accountWhen you first access OfficePro, you will be asked to log in with your Practice Name and Practice Pass. The Practice Name and Practice Pass were sent with your welcome email from your NaturaeSoft account representative. (Your Practice Pass is often “Dr” and your last name with no spaces). The Practice is of course the name of your practice. Since spelling and grammar matter in these fields, it is best that you reference the exact practice and practice pass sent to you in your welcome email. Once you have successfully logged on to the service your Practice Name and Practice Pass will be saved locally and you will only need your username and user password when logging in from this same device. While your practice pass should be kept fairly secure it will be given out to anyone who needs to access the system so keep it easy to remember and make sure it has nothing in common with your User Password for access to the system. Note: You can access your service from multiple workstations with multiple users simultaneously. Login with User Name and PasswordIf this is your first time logging in as a system administrator you can use the username Admin and the password OfficePro to log in and set up other user accounts. If you are a provider and your account was preset by NaturaeSoft your user name will likely be your first initial and last name (e.g. Sam Smith → SSmith). The default password for all accounts at the onset is “OfficePro”. When you log in with the password of “OfficePro” the service will prompt you to update your password information. For your security please choose a strong and secure password. If you want o change your password you can do so from the “Account” link off of the user bar at the top of every page. Once logged in you will see “your name” or “Admin” in the Admin bar in the color for your user account. Click on the “Account” button to change your password easily from here. Passwords are case-sensitive. All OfficePro customers are given the same Admin username and password, so please change the password for the Admin user to secure your account. Want to watch a tutorial on this. Click here for our Academy video tutorial on "Logging into OfficePro for the first time" |
 |
|
| 13 |
Configuration Walk ThroughConfiguration Walk ThroughThe OfficePro service includes a configuration walk-through that shows you how to get your service set up and ready for use in your practice. The Configuration WizardOfficePro 11.0 comes equipped with a configuration wizard to help you get your system configured faster than ever. The configuration wizard is accessible on the footer of your service from the grey gear cog icon. When you mouse over this icon the configuration progress window will pop up showing you the steps to completion of your services configuration. When you click on the configuration steps the configuration window pops up giving you access to manage and complete the configuration steps right from the window. The configuration window is also accessible by clicking the configuration details link at the bottom of the configuration progress bar. The Configuration WindowThe configuration window welcomes you to NaturaeSoft and provides details on the configuration of your service. Each section of the configuration wizard orients you and gives access to the settings for your practice. Please walk through and complete as many of these steps as possible before beginning to use your OfficePro service. These steps covered in the configuration wizard are congruent to the steps outlined in the next section of the manual. Each will be covered in detail but from outside of the context of the wizard itself. To access the configuration wizard click on the grey gear icon on the bottom of the service and then choose configuration details. Configuration Outline
|
|
|
| 15 |
Admin General Settings PageAdmin General Settings PageAll general settings for your OfficePro services can be administered from the Admin > General Settings menu option. This takes you to the General Administrative Settings page where you will have access to configuring all facets of the setup of your service. Only users with designated Administrative rights will be able to access the general settings page. Users with access to the settings can change a wide array of critical settings and this access level should only be given to those that you trust with the management of the service. On the General Settings page there are several tabs that give access to each facet of the services settings. They include:
|
|
|
| 16 |
Managing ProvidersManaging ProvidersProvider AdministrationProviders (health care professionals) are the core of OfficePro, with the scheduling and reporting systems built around them. Editing Provider SettingsTo get started, you’ll need to configure the settings for each scheduled provider at your clinic. Your OfficePro account includes a limited number of providers based on your service agreement. If you need to add more providers, please contact your NaturaeSoft Customer Service Coordinator.
Setting Provider SchedulesYou can set a provider’s weekly schedule in the Schedule tab within the Edit Provider window. Changes are automatically saved in the background, and you’ll see a status update at the bottom of the tab when the save is complete. After editing the provider's details, you can set the provider’s daily schedule by clicking the button next to their name. This will open a window where you can adjust their regular daily availability.
Provider Account ManagementTo add another provider, go to the Practice Tab under Admin > General Settings. Click the Add Provider button. You can add as many active providers as your account allows. If you need more providers than your current limit, contact your NaturaeSoft Customer Service Coordinator. Managing ProvidersOnce a provider has been added and visits are scheduled, all visit data is linked to that provider’s account. If a provider leaves your practice, do not delete their account, as it will erase their visit history. Instead, OfficePro allows you to deactivate providers while retaining their records.
Deactivating a ProviderTo deactivate a provider, click the button next to their name and confirm the action. The system will refresh, and the checkmark next to the provider's name will indicate that they are deactivated. Reactivating a ProviderTo reactivate a deactivated provider, click the button next to their name. Confirm the action. Note: If you’ve reached the limit of active providers, you will need to contact your NaturaeSoft Customer Service Coordinator to activate additional providers. |
|
|
| 17 |
User AdministrationUser AdministrationUser accounts allow access to your system. You will want to set up a user account for each of the staff members whom you wish to have access. You are allowed as many users as you like to assist you in the management of your practice. Each user can have personalized access to the features you choose. A User account is automatically created for the new provider when you are added to the service. Add User AccountsWhen adding or editing User Accounts, you can decide what information you allow each user to access. Please review each of these functions carefully to protect your information. At the top of the Security tab is a field marked User Access. If you check the box marked Administrator a user will have access to all areas of OfficePro. If you want to limit the user’s access to certain areas of OfficePro, this box should remain unchecked. The following list explains each access area. Change your Password
|
|
|
| 60 |
Setting Up Multi-Factor AuthenticationSetting Up Multi-Factor AuthenticationMulti-factor authentication (MFA) asks for a second piece of proof after the password, so a stolen or guessed password is not enough on its own to reach patient records. OfficePro offers two methods, and each user sets up their own. The two methods
A user can set up both. If both are enrolled, the authenticator app is offered first and the text message is available as a fallback. Set up your own account
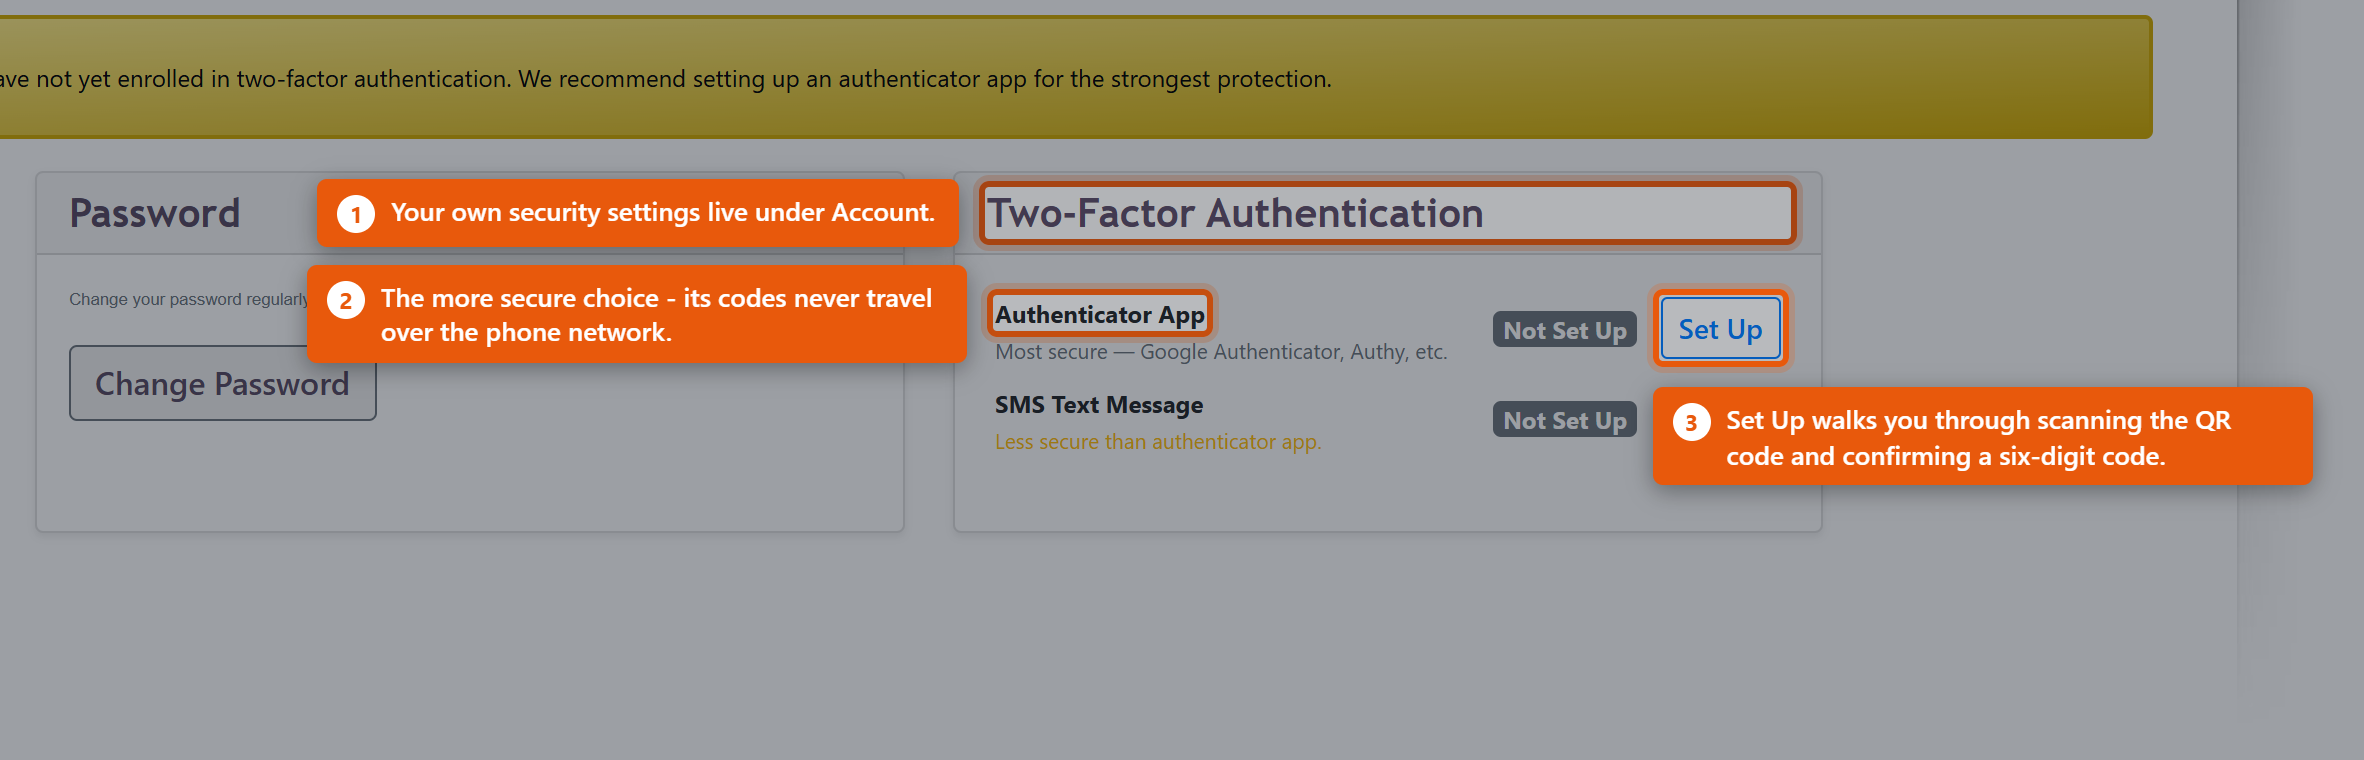 The method then reads Enrolled. To use a text message instead, click Set Up beside SMS Text Message, enter the number under Mobile Phone Number - Include country code (e.g. +1 for US) - and click Send Verification Code, then enter the code that arrives. If it does not arrive, Change number / Resend will send it again or let you correct the number. To stop using a method, click Remove beside it. Require it across the practiceSetting up MFA is voluntary until an administrator requires it. There are two ways to do that, both on the Admin page in the Users section.
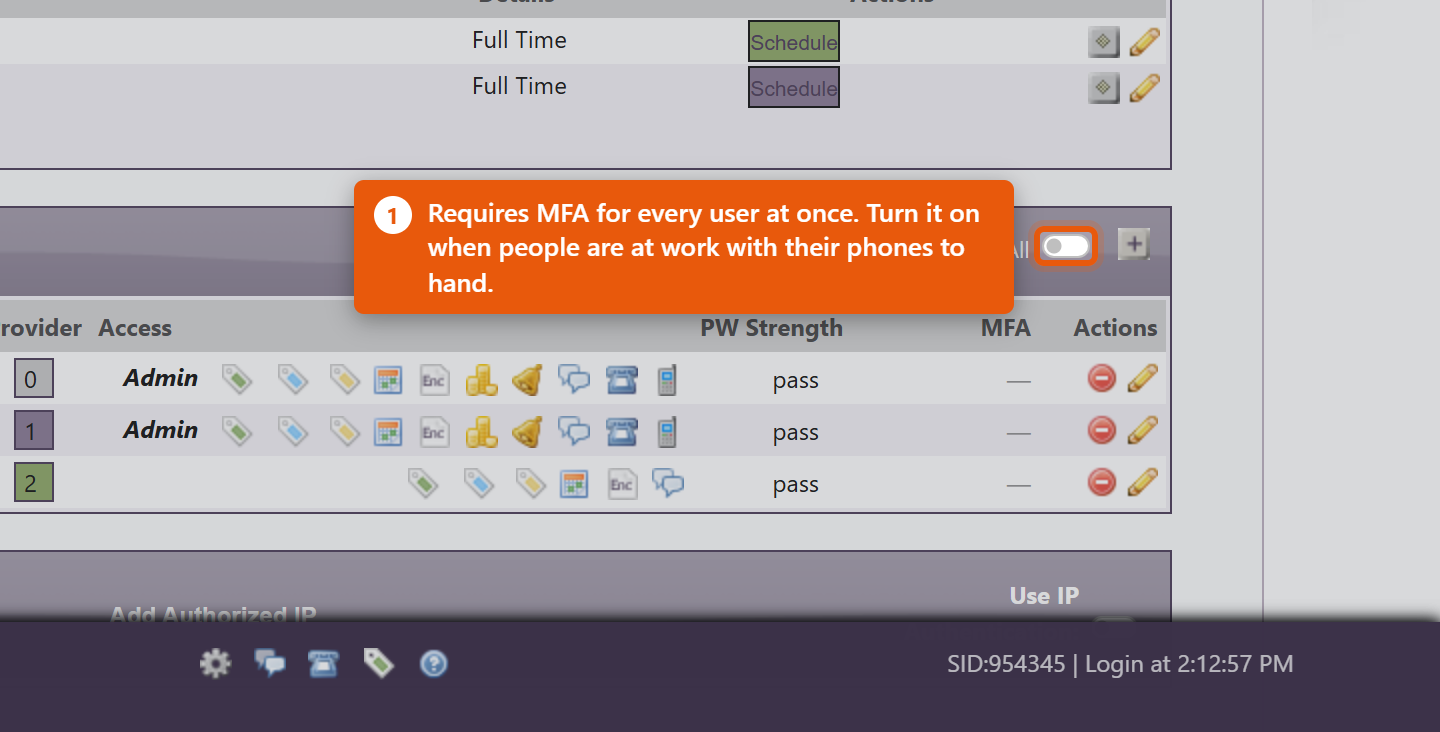 Requiring MFA does not enrol anyone. It means that the next time that person signs in, they must finish setting up a method before they can carry on. Turn it on when the people affected are at work and able to reach their phones, not last thing on a Friday. Read the Users list at a glanceThe MFA column on the Users list shows where each person stands. Hover an icon to read it:
When someone loses their phoneA new or wiped phone no longer holds the enrolment, and the old codes are gone. An administrator clears it so the user can start again: open Edit User, and under MFA Status: beside Authenticator App: click Reset TOTP. The user is then Not enrolled and sets the app up again from their own Account page. Only an administrator can do this, and it is deliberate - being able to clear your own second factor would defeat the point of having one. |
|
|
| 61 |
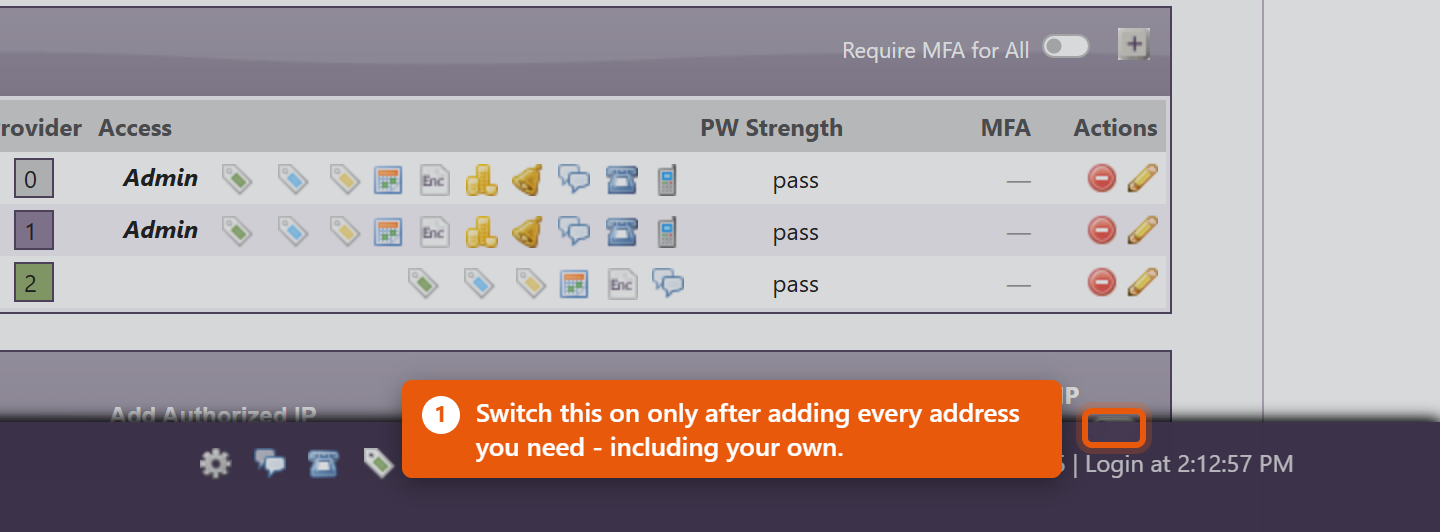
Restricting Access by IP AddressRestricting Access by IP AddressIP authentication limits sign-in to the internet connections you name - typically the clinic itself, and the home connections of anyone who works remotely. Someone with a valid username, password and MFA code still cannot get in from anywhere else. This is a strong control and it locks out the innocent as readily as the malicious. Read the warning at the end before switching it on. Turn it on
 Add an address
The listEach row shows IP, Status, User / Description, Requested, Authorized and Actions. When someone tries to sign in from an address that is not on the list, they are refused and the attempt is recorded as a request. Review these: if it is your own colleague working from a new place, click Authorize on that row and they can sign in. If you do not recognise it, leave it - an unauthorised row does nothing. Before you switch this onMost practices do not have a fixed address. Unless you pay your internet provider for a static IP, the clinic address can change on its own - after a power cut, a router restart, or an engineer visit - and when it changes, everybody is locked out at once, including you. Nobody can reach the Admin page to correct it, because the Admin page is behind the same check. So:
For most practices, requiring multi-factor authentication gives most of the protection with none of the lockout risk. Consider that first, and add IP restriction only where the extra strictness is genuinely needed. |
|
|
| 78 |
Bulk Messaging and Your SMS NumberBulk Messaging and Your SMS NumberBulk messaging sends an email or a text to a group of patients at once, chosen by the tags on their records. Two things need setting up first: the hours campaigns are allowed to send in, and - if you want to text - a phone number for the practice. The send windowCampaigns are not sent the moment you press the button. They are queued, and a background process works through them. The window decides when that is allowed to happen, and it is set in BackOfficePro admin under Only send during these hours, with a From and a to, plus Skip weekends. Set it to hours a patient would not mind hearing from you - most practices use something like 9am to 6pm and skip weekends. A text arriving at 3am does more damage to a practice's standing than the campaign was ever going to earn. Understand what the window does to a send: press Send now outside the window and the campaign is accepted and queued, and nothing goes out until the window opens. Progress sits at zero in the meantime, which looks exactly like a fault. It is not. Getting an SMS numberTexting needs a phone number that belongs to the practice. In SMS Messaging Settings, Request an SMS number provisions one, and you will see New Number Provisioned and then Your SMS number once it is live. This is the number patients see, and replies come back to it, so treat it as a published clinic number rather than an internal detail. Release this number gives it up - do that only if you are certain, because a released number goes back to the pool and cannot be reclaimed. Tags decide who gets itAn audience is built from patient tags, so bulk messaging is only as good as the tagging underneath it. Tags are managed in BackOfficePro. Keep them meaningful and few. Tags describing something durable - a programme a patient is on, a condition you run recalls for - are useful for years. Tags describing a one-off event stop being true almost immediately and quietly ruin later audiences. Before the first campaign
One legal point worth being clear about: patients who have asked not to receive marketing must not be in a marketing audience, whatever their tags say. The software will send what you ask it to send. |
|
|
| 18 |
Managing Clinic Rooms and ResourcesManaging Clinic Rooms and ResourcesAdd a Room or Resource
Edit or delete a Room or Resource
|
|
|
| 19 |
Create HolidayCreate HolidayCreate Holidays
|
|
|
| 64 |
Setting Up Sales TaxSetting Up Sales TaxSales tax in OfficePro is built from three pieces. Set them up in this order and the rest follows.
Everything below lives on the Admin page, under Sales Tax Setup Information. 1. Add each jurisdiction
Add one row per authority. Do not add a single combined row for "sales tax" at the total rate - you will not be able to break the figure down by authority when you file, which is the reason for keeping them apart. 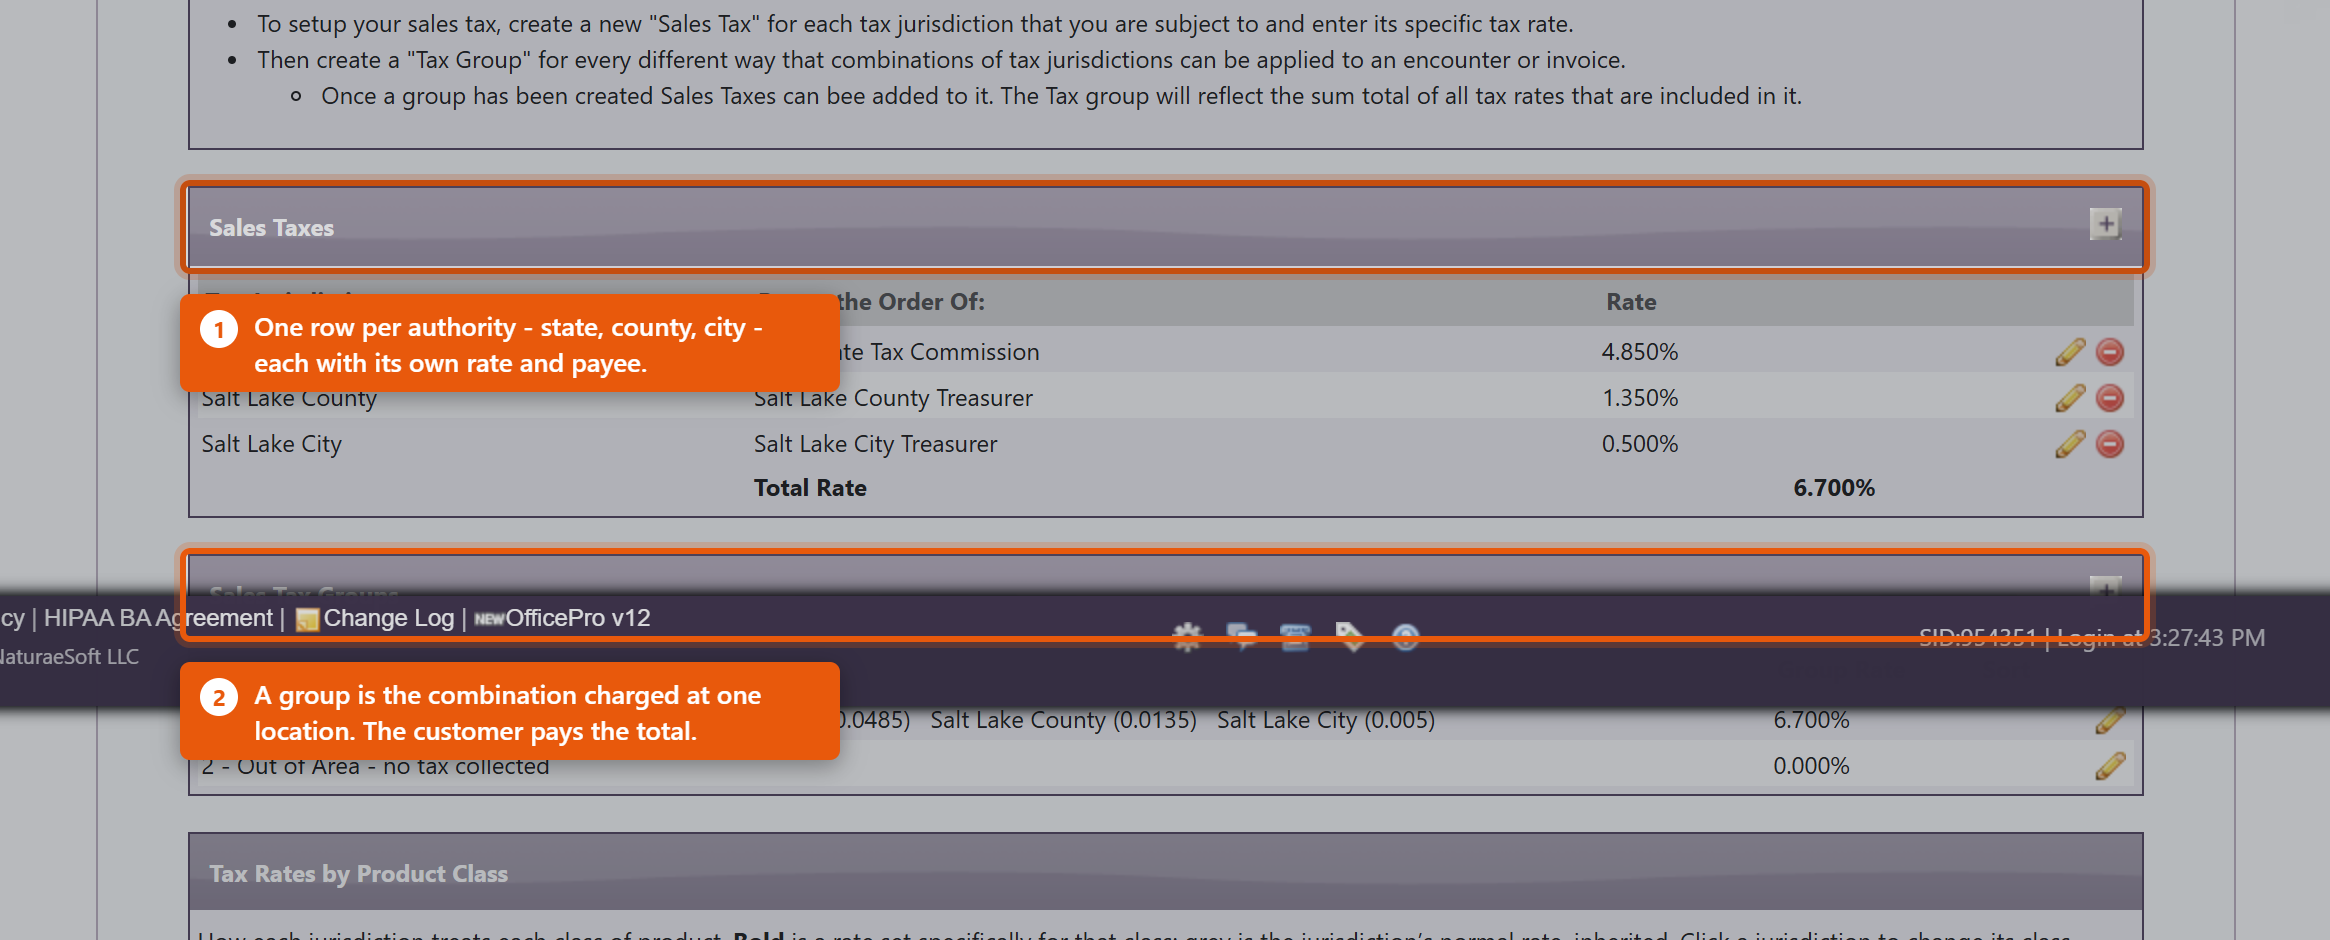 2. Build the groups
The Group Rate column shows the combined figure. Two things to know about it:
A group with no jurisdictions is a real, useful setting, not an unfinished one. It means "no tax here", and it is how you handle orders shipped somewhere you have no obligation to collect. Most practices want exactly one of these. 3. Say where each group appliesUnder Ship-To Regions, click Add Ship-To Region and pair a Destination with the tax group it should use. The Everywhere else row is the catch-all for any destination you have not named - point it at your no-tax group unless you genuinely collect tax nationwide. When an order is placed, the destination decides the group, the group decides the rate, and the rate is worked out and saved onto that line. Changing rates later does not rewrite historyThis is the question every administrator asks first, so to be plain: editing a rate does not change what past orders charged. Each line stores the rate applied when it was created. Put the new rate in on the day it takes effect and past sales, refunds against them and your filed returns all keep the figures they had. The one thing to be careful of is the reverse: because only one rate is held per jurisdiction, a report that recalculates tax from today's configuration rather than reading what each line stored will misstate a closed period. Read the sales tax report, which uses the stored figures. Before you rely on it
Rates and rules are set by your tax authority and change without telling you. OfficePro charges what you configure; confirming what to configure is your accountant's job, not the software's. |
|
|
| 65 |
Sales Tax by Product ClassSales Tax by Product ClassMany states tax some goods at a lower rate than others - groceries and supplements are the usual example - and some exempt them entirely. A product class is how you tell OfficePro which of your products those rules apply to, so the right rate is charged without anyone remembering to intervene. The classes are Standard, Grocery and Exempt. Every product carries one; anything you have not classified is Standard. Set a jurisdiction's class rates
The distinction that matters mostAn empty box and a zero mean different things, and getting them the wrong way round is the most expensive mistake available on this screen.
So if your state exempts groceries and you leave Grocery empty, every grocery item is charged the full standard rate and nothing warns you - the configuration is valid, it just says something you did not mean. Enter 0. Clearing a box that had a rate restores inheritance, which is why the value disappears rather than becoming zero. "Exempt" applies to one jurisdiction, not to the whole billThis is the part that catches people out. Class rates are set per jurisdiction, so putting 0 against Exempt on your state does nothing about your county and your city. They carry on charging their normal rate on the same product. Using the example above - state 4.85%, county 1.35%, city 0.5%, with Exempt set to 0 on the state only:
So a product marked exempt is still charged 1.85%, and the practice believes it is charging nothing. If something is genuinely exempt everywhere you collect, set 0 against that class on every jurisdiction in the group, not just the state. The grid shows this if you know what to look for: a rate in bold was set for that class, and a grey one is the jurisdiction's normal rate being inherited. Grey in the Exempt column means that jurisdiction is still charging. 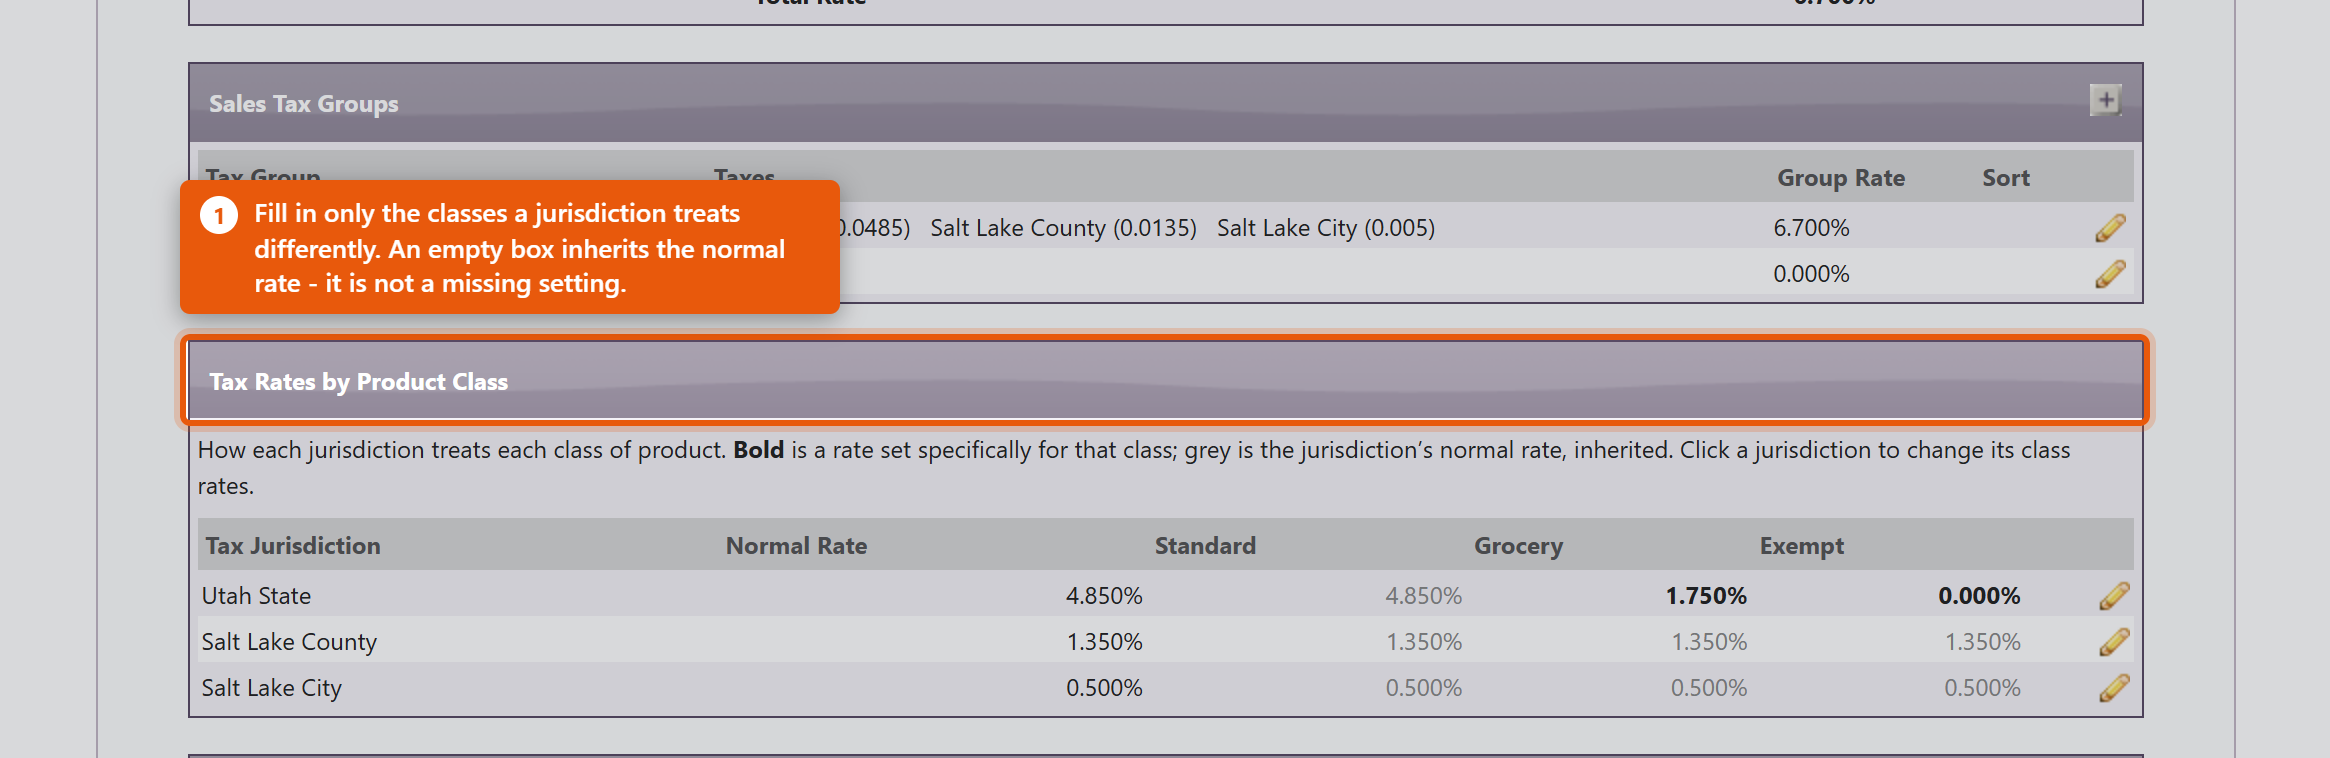 Rates are decimalsSame as everywhere else in this area: 1.75% is 0.0175. The box tells you what percentage it read back, and refuses anything at or above 1 because a rate of 100% or more is always a typo. A worked exampleA Utah practice charging state 4.85%, county 1.35% and city 0.5%, where the state taxes food at 1.75% but the county and city tax it the same as anything else:
A standard product is then charged 4.85 + 1.35 + 0.5 = 6.7%, and a grocery product 1.75 + 1.35 + 0.5 = 3.6%. Each jurisdiction contributes its own view of the class, which is why the classes are set per jurisdiction rather than once for the whole group. Classify the productsA class rate does nothing until products are assigned to that class. Set Product Tax Classes on the product itself. Reduced rates and exemptions are worth getting right on the products you sell most - that is where the money is. Check itWhat Each Tax Group Actually Charges on the Admin page shows the resulting rate for every group and class together. Read it after any change: it is the quickest way to catch a rate that has been entered as a percentage, or a class left inheriting when it should be exempt. 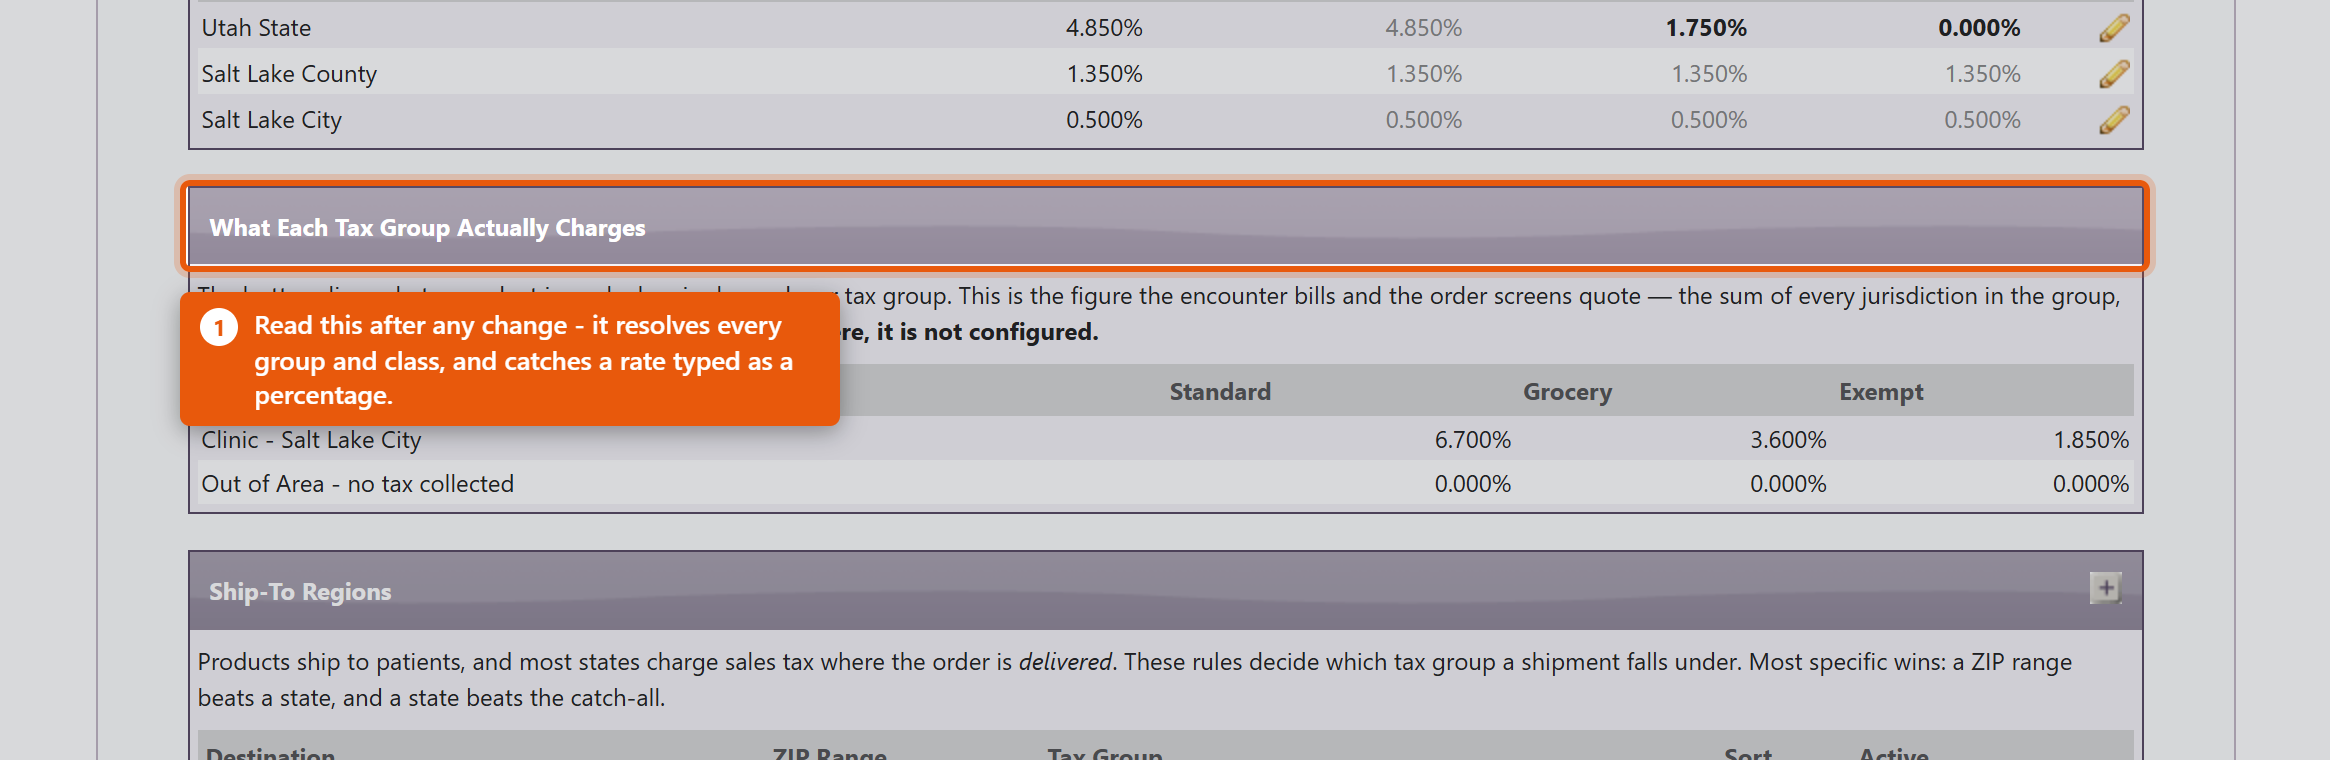 A practice that has configured no class rates at all is charged the plain jurisdiction rates on everything, exactly as before this feature existed. Nothing changes until you use it. |
|
|
| 47 |
Managing Email Settings in OfficeProManaging Email Settings in OfficeProOfficePro enables your practice to send emails such as forms, reminders, and teasers to your patients. To effectively configure this feature, you need to set up your company's email server. Setting Up Your Email ServerAccess Email Settings:
Enter Email Server Information:
Test Your Email Settings:
HIPAA Privacy Statement
Using Gmail with OfficeProIf you're using Gmail, follow these settings:
Additional Gmail Security SettingsIf you're having trouble connecting your Gmail account, ensure your password and other account details are correct. You may need to complete one of the following steps: Allow Less Secure Apps:
Create an Application-Specific Password:
By following these steps, you can successfully manage your email settings within OfficePro, ensuring effective communication with your patients while adhering to HIPAA regulations. If you encounter any issues, please reach out to NaturaeSoft support for assistance. |
|
|
| 96 |
Setting Up Online SchedulingSetting Up Online SchedulingOnline scheduling lets patients book themselves in from your website. It takes two settings that people routinely mistake for one, so do both before you tell anyone the feature is live. The two switchesOnline Scheduling Enabled on the ApptPro Admin page turns the feature on for the practice. That alone books nothing. Each appointment type then has its own Offer Online toggle. Only types you switch on there can be booked, and until at least one is on, the booking page loads and offers a patient nothing at all. This is the most common way online scheduling appears broken, and it is silent - there is no warning that the practice switch is on with nothing behind it. Turn on the types in the same sitting as the practice switch. Choosing what to offerThe visit type list shows each type with its Duration: and Estimated Price:, which is what a patient is committing to. Check both read sensibly before offering a type - a wrong duration books the wrong amount of your day, every time. Give every offered type an online description. It is the only explanation a patient gets of what they are booking, and a type offered without one is a slot with no context. Start with two or three straightforward types. New patient appointments, anything needing triage, and anything expensive are better booked by a person, at least at first. Portal featuresUnder Portal Features you choose what else patients can do - Ask the Doctor, Documents, History, Products, Providers, Uploads. Each is independent of scheduling. Turn on only what you will actually service. Ask the Doctor in particular creates messages somebody has to answer, and an unanswered patient message is worse than a feature you never offered. Terms and disclaimerPortal Disclaimer and Terms and Portal Terms and Conditions for Patients are what patients agree to. Write them before you go live, and have whoever advises you on such things read them - this is the one part of the setup that is not easily undone after patients have accepted it. AppearancePortal Style carries Main Colors and an Accent, a Header Font and Content Font, a Header Image and the Dimensions it embeds at. Match your website closely enough that a patient does not think they have been sent somewhere else. Before you publish the link
Use Save your portal settings as you go. |
 |
|
| 88 |
Setting Up Electronic Claims and ERAsSetting Up Electronic Claims and ERAsBillPro submits your claims electronically and brings the payers' remittances back in. Both halves are enrolments handled through a clearinghouse, and neither happens the day you ask for it - so start earlier than feels necessary. How it fits togetherOfficePro builds the claim, the clearinghouse delivers it to the payer, and the payer sends back an electronic remittance advice - an ERA - saying what it paid and what it did not. The BillPro Account Center describes this as BillPro - Electronic Claims Submission, Powered by ClaimMD. Enrol each tax IDEnrolment is per business entity, not per practice. BillPro Enrolled Businesses : lists your Enrolled Entities with an Account #, Group and TaxID. If you bill under more than one tax ID - a second location, a separate professional corporation - each needs its own enrolment. Claims for an unenrolled tax ID have nowhere to go. Enrol for ERAs separatelyThis is the step people miss. Being able to send claims does not mean you will receive remittances. ERA enrolment is a separate agreement with each payer, and the big payers are the slow ones - allow weeks, not days. Until a payer's ERA enrolment completes, its payments arrive as paper cheques and have to be posted by hand. That is workable, but it is not what you are paying for, so track which payers are done. Enrolment forms are generated from OfficePro - the Claim Enrollment Link under Connecting to ClaimMD produces the link to complete. Check your billing details before the first claimThese appear on every claim and a mistake in them rejects everything at once rather than one claim at a time:
Send one real claim to one payer and follow it all the way to an ERA before you switch the practice over. A test of the whole path is worth more than checking each setting twice. Where you will work day to dayThe BillPro Billing Center is the hub. From there:
|
 |
|
| 7 |
Configuring your ChartPro ServiceConfiguring your ChartPro ServiceChartPro is set up once and then largely left alone. The work is deciding what your chart notes should contain and in what order, which is done from ChartPro Administration. How a note is put togetherThree things stack up:
The Sections panel shows the five tabs with their segments beneath. Each segment has a short code and a number setting its position, and an Edit to open it. Add a Segment to this section adds a new one. 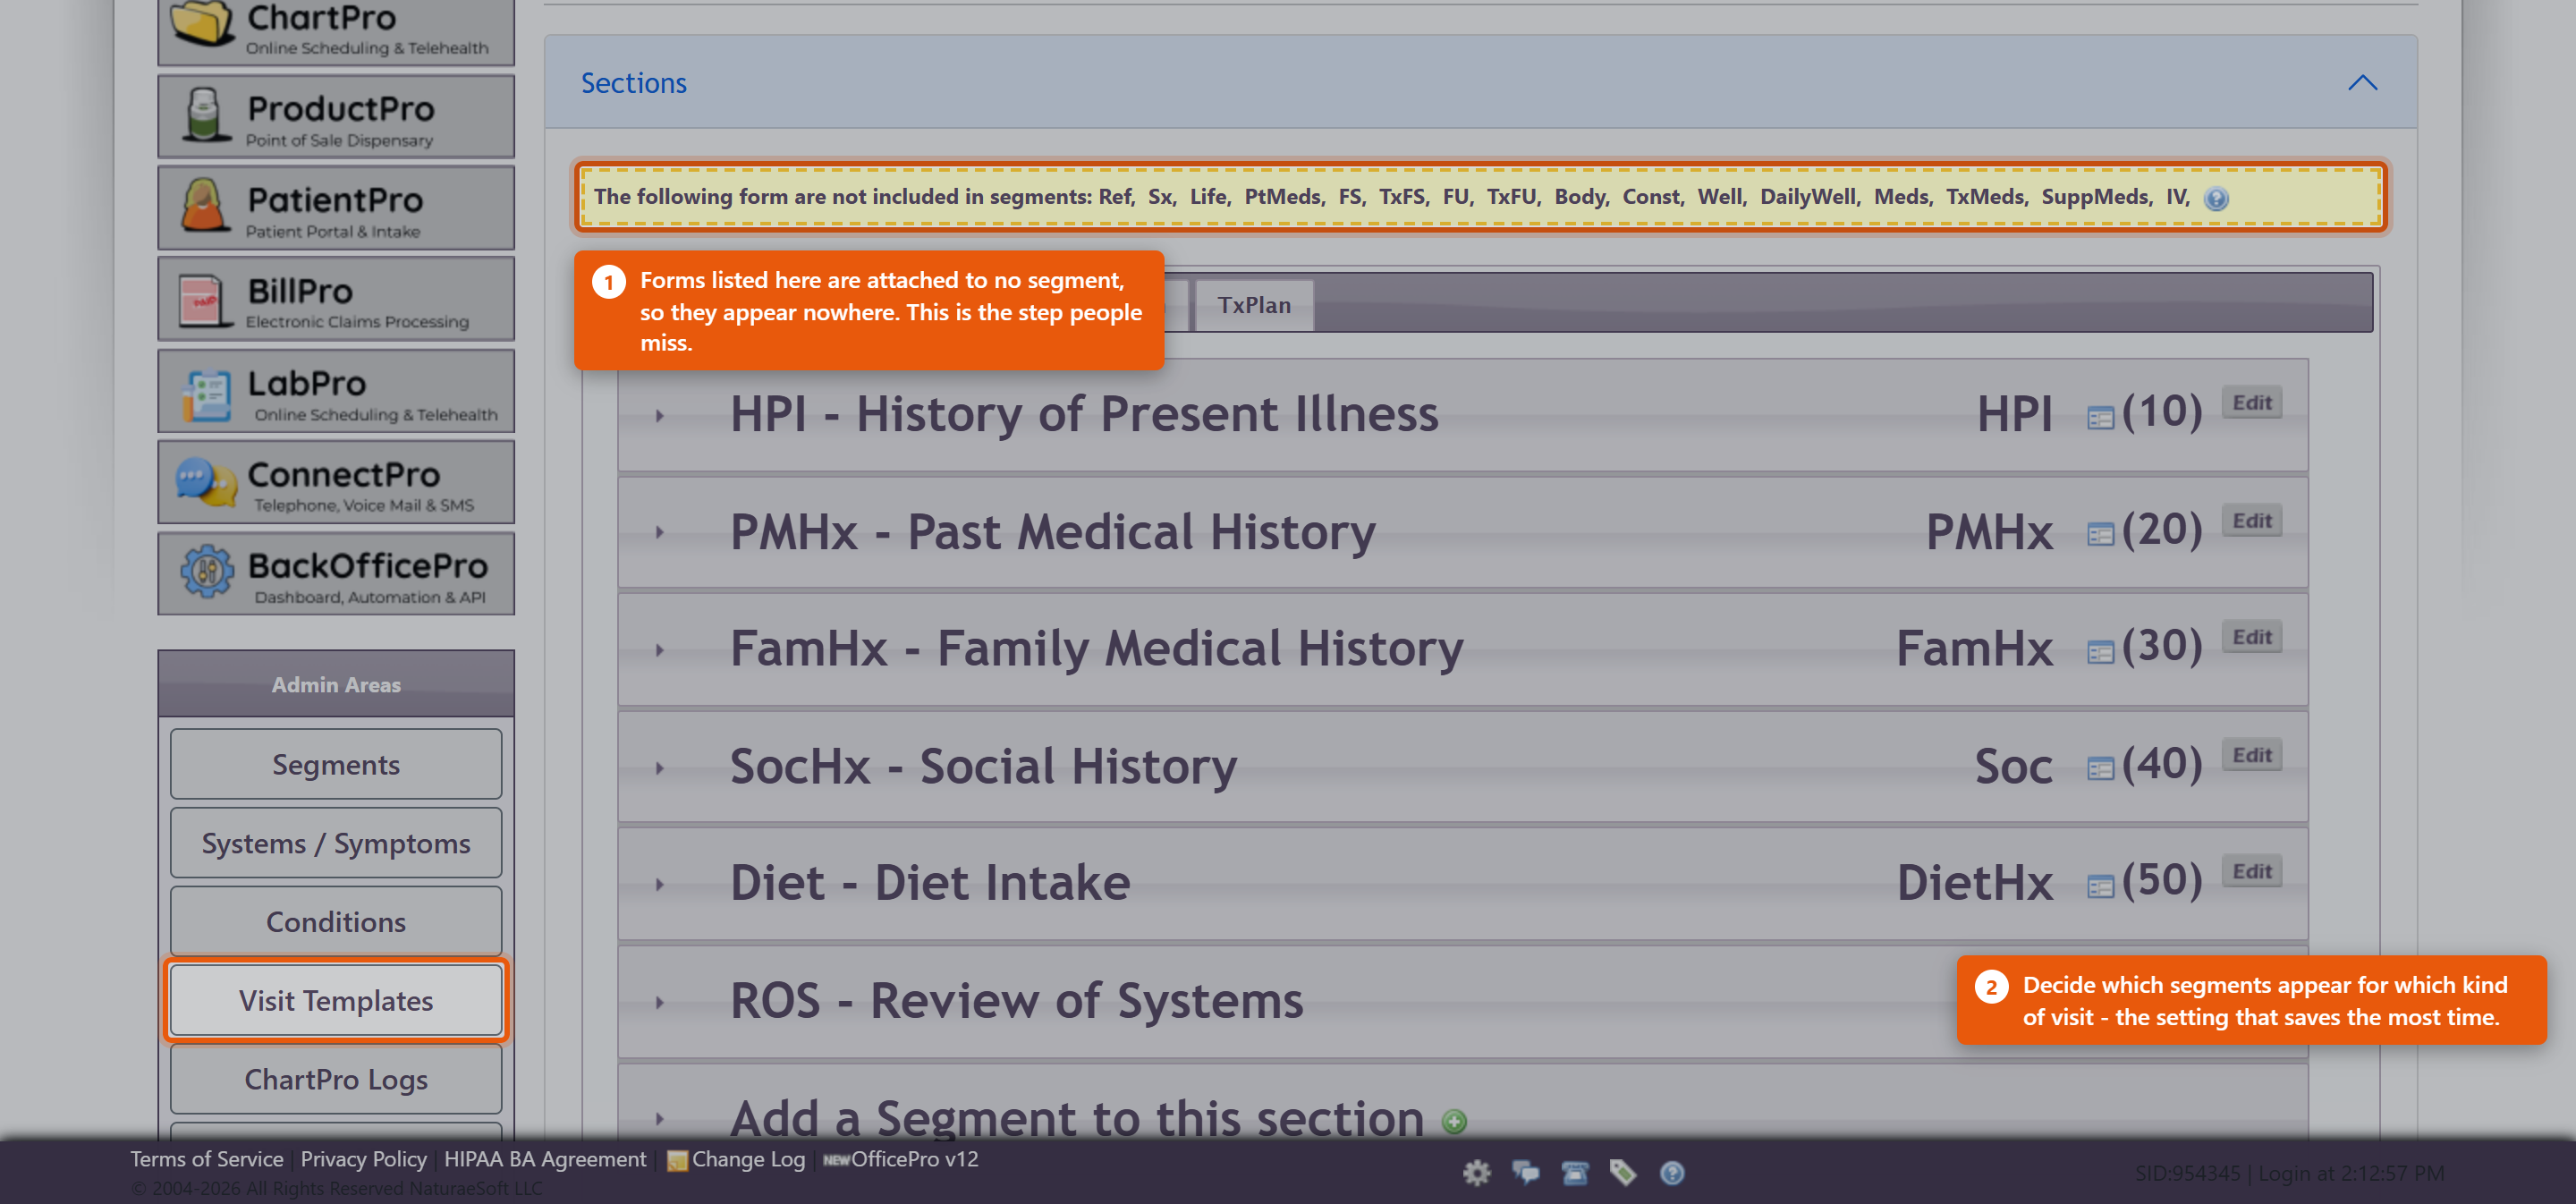 Setting up a segmentEdit Segment Details holds the name and description. Two settings matter more than they look:
Add to Templates puts the segment into your visit templates. The other admin areas
Getting startedDo not redesign everything before seeing patients. The supplied sections and segments are a working note for most practices.
A note designed in the abstract is almost always longer than the one you end up wanting. Practices giving IV therapyThe IV form is attached in exactly this way, and it is a common reason the IV panel appears to be missing. Enabling IV therapy in ProductPro settings is only the first step - the form still has to be attached to a segment here. See Setting Up IV Therapy Products. |
 |
|
| 100 |
Introducing ChartPro AI to Your PracticeIntroducing ChartPro AI to Your PracticeChartPro AI listens to a consultation and drafts the chart note from it. The provider then reads the draft and decides whether it goes into the record. There is nothing to install and no switch to turn on - it is available to every ChartPro practice, and it is marked BETA on screen. What there is to do is decide how your practice will use it, before a provider uses it in front of a patient. Decide about consent firstThis records a conversation with a patient. What you must tell them, and whether you need their agreement, depends on where you practise and is not something this article can answer for you. Settle it with whoever advises you on such matters, write down what your providers should say, and do that before the first recording - not after a patient asks what the phone on the desk is doing. The draft is a draftThe note is generated from a transcript of a spoken conversation. It can mishear, and it can be confidently wrong about a number or a name. The provider signing the note owns everything in it, exactly as if they had typed it. Make that explicit when you introduce it. The failure worth guarding against is not a bad draft - it is a good-looking draft accepted without being read. Start with a few willing providersIt suits some consultations far better than others. A structured follow-up transcribes well; a long, discursive intake with three people in the room is harder. Let a couple of providers try it on their own patients for a fortnight and report back before you roll it out. Watch the usage counterThe Auto Chart button shows each provider's use for the current calendar month against 40 - as a badge on the button and a bar on the recorder. It turns amber as it approaches and changes again past it. Going over does not stop anything. The counter is an indicator, not a gate: dictation keeps working. It is there so a provider can see their own pace, and so you can see who has actually adopted it. Review what it is writingReview past ChartPro AI encounters opens ChartPro AI - Encounter Review, which lists every encounter with its Date, Encounter # and Note Quality, and shows both the Transcript and the ChartPro AI Note side by side. Look through it a few times in the first month. Reading a transcript against the note it produced is the fastest way to calibrate how much your providers should trust it, and it is the only place you can see that. Ask your providers to rate notesEvery note can be rated, and almost none are - across all practices using it, a handful of ratings against hundreds of encounters. A rating on a note that came out wrong is worth far more than one on a note that came out fine, so ask specifically for those. |
|
|
| 37 |
Managing ChartPro Note SegmentsManaging ChartPro Note SegmentsAccess the ChartPro Admin Page:
View Existing Segments:
Add a New Segment:
Configure the New Segment: When adding a segment, you will need to fill in the following fields:
Save Changes:
Adjusting Segment Order
ConclusionThis process allows you to customize the charting experience in OfficePro by managing segments within the ChartPro admin page. Tailoring the segments to fit your practice's specific needs can enhance the efficiency and effectiveness of your documentation. |
|
|
| 92 |
Setting Up LabProSetting Up LabProLabPro sends lab orders out and brings results back in electronically, so they land on the patient's chart instead of arriving as faxes to be scanned. Setting it up is mostly account work with the laboratory. The parts inside OfficePro are quick; the parts outside it are not, so start with the lab. Get an account with each labEvery laboratory you send to needs its own account, and each is recorded against a provider with the account number the lab issued. If two providers order under separate accounts at the same lab, both are recorded separately. Get the account numbers right before your first order. A requisition sent under the wrong account is a result that comes back to somebody else. Set up the demographic bridgeOrders are placed in LabCorp Link rather than in OfficePro. To stop your staff typing every patient twice, OfficePro exposes a demographic bridge that LabCorp Link calls when you search for a patient by MRN or patient ID. It returns the patient's details and your insurance company list. It authenticates by IP address, so the clinic's public IP has to be registered with us. That is worth arranging before your first order rather than discovering at the counter - and worth revisiting whenever your internet connection or office moves, because a changed IP silently stops the lookup working. Specimen collection arrangements - whether patients go to a draw centre or you draw in-clinic, and the supplies and courier that go with it - are agreed with the lab directly. Check how results will come backResults arrive electronically and attach themselves to the patient. That matching depends on the demographics you send matching what the lab returns, so before you rely on it:
Plan to check for unassigned results from the start. Some results will arrive that cannot be matched to a patient automatically - a name spelt differently, a date of birth keyed wrong at the lab. They do not appear on any chart and nothing chases them. Make reviewing them somebody's weekly job before the backlog exists rather than after. Fullscript labsLabs ordered through Fullscript come back separately, under Fullscript Labs. That needs Fullscript provider setup - each ordering practitioner mapped to a provider in OfficePro - or results arrive with nobody to route them to. Where you will workThe LabPro home page carries Process Labs for results waiting to be dealt with, LabPro Lab Reports for everything received, and Stats for this Week. |
 |
|
| 81 |
Setting Up a Check-In KioskSetting Up a Check-In KioskA kiosk is a tablet in your waiting room that lets patients check themselves in and out. It cuts queueing at the front desk and captures insurance and payment without anyone at reception retyping it. It is also a logged-in device left unattended in a public room, so the first thing to get right is the lock. Order the hardwareDevices are ordered through OfficePro. In device administration, New Device Order asks for an Order Type: and records who it was Ordered By: against your Practice: and Customer ID:. The list then shows each Device and Type with its Status / Action - Pending while it is being prepared, Active once it is in service, Owned where you bought it outright - along with Start Date, End Date, Monthly cost and any Commitment. Disable takes a device out of service. You can use your own tablet. The mounting hardware (a BouncePad or similar) matters more than people expect: a tablet that can be picked up will be picked up. Lock the kioskThis is the part not to skip. A kiosk sits logged in, showing patient names to whoever is in the room. The authenticator lock is what stops someone browsing your records while reception is busy.
Enrol at least two staff phones. A kiosk that only one person can unlock is a kiosk that is locked whenever that person is off. Card readers, if you use themNFC patient cards let someone check in by tapping a card instead of typing their name. The reader needs a small local helper: from the NFC Card Reader add-on, use Download NFC Bridge Installer and run Install.bat on that machine. The NFC Bridge runs locally on the machine with the reader attached, so it has to be installed on each one - it is not a practice-wide setting. Before you put it in the waiting room
|
 |
|
| 45 |
Setting Up the Online Patient PortalSetting Up the Online Patient PortalTo provide your patients access to their appointment schedules and visit documents, you need to configure the Patient Portal in OfficePro. Follow these steps to get started: Step 1: Create Visit Types
Step 2: Configure Portal Style and ContentAccess PatientPro:
Portal Style:
Embed the Portal:
Portal Location:
Providers Section:
Scheduling Section:
Embedding Links and Buttons:
After making your changes, click Save Portal Settings at the bottom of the page. Step 3: Preview Your Portal
Scheduling Tips
Step 4: Additional FeaturesReturn to Tools > PatientPro to access more portal settings. Enable Features:
ConclusionOnce your portal is configured and activated, your patients can begin accessing it for scheduling and document retrieval. Regularly check and update the settings as needed to enhance the patient experience. If you need to make any changes, return to Tools > PatientPro, and don’t forget to click Save Portal Settings to apply any modifications! |
|
|
| 49 |
How to Embed Your PortalHow to Embed Your PortalStep 1: Add the Embed Code to Your WebsiteCopy and paste the following code where you want the portal to appear on your website: html CopyEdit <script src="https://portal.naturaesoft.com/Get_Embed_JS" data-practicepass="YOUR_PRACTICE_PASS" data-container-id="portal-container"> </script> <!-- Target container for the portal iframe --> <div id="portal-container"></div> Important: Replace YOUR_PRACTICE_PASS with your assigned Practice Pass code. Make sure you include the <div id="portal-container"></div> on the page — the portal will load into this area. Step 2: Where to Place the CodeYou can place this code: On a specific page (e.g., yourdomain.com/portal) Inside any content editor that supports raw HTML (WordPress, Wix, Squarespace, etc.) In your website’s HTML templates (if you have developer access) We recommend placing it where you want the portal to appear (not in the <head>). Step 3: Portal Loading and Behavior✅ The portal will automatically load inside the container. Optional CustomizationsYou can also: Change the container's size by adjusting the surrounding <div> styles (CSS) Add margin or padding if you want extra space around the portal Contact us if you want a custom theme or branded portal appearance TroubleshootingIf you do not see the portal: Confirm that the data-practicepass attribute matches your Practice Pass exactly. Make sure you included the <div> with the correct id. Check for typos in the script tag or div id. Still need help? |
|
|
| 42 |
Adding and Editing ProductsAdding and Editing ProductsProducts are managed from Product Administration. Open the Admin menu and choose Product Admin from the list on the left. Finding a productTwo tools sit at the top of the page. Search Products takes part of a name or product code - type a few letters and click Go. Filter By Vendor narrows the list to one supplier, which is the quicker route when you are working through a delivery or reviewing one vendor's pricing. The Product List also offers Select by First Letter for browsing, and Clear to drop the current filter and start again. 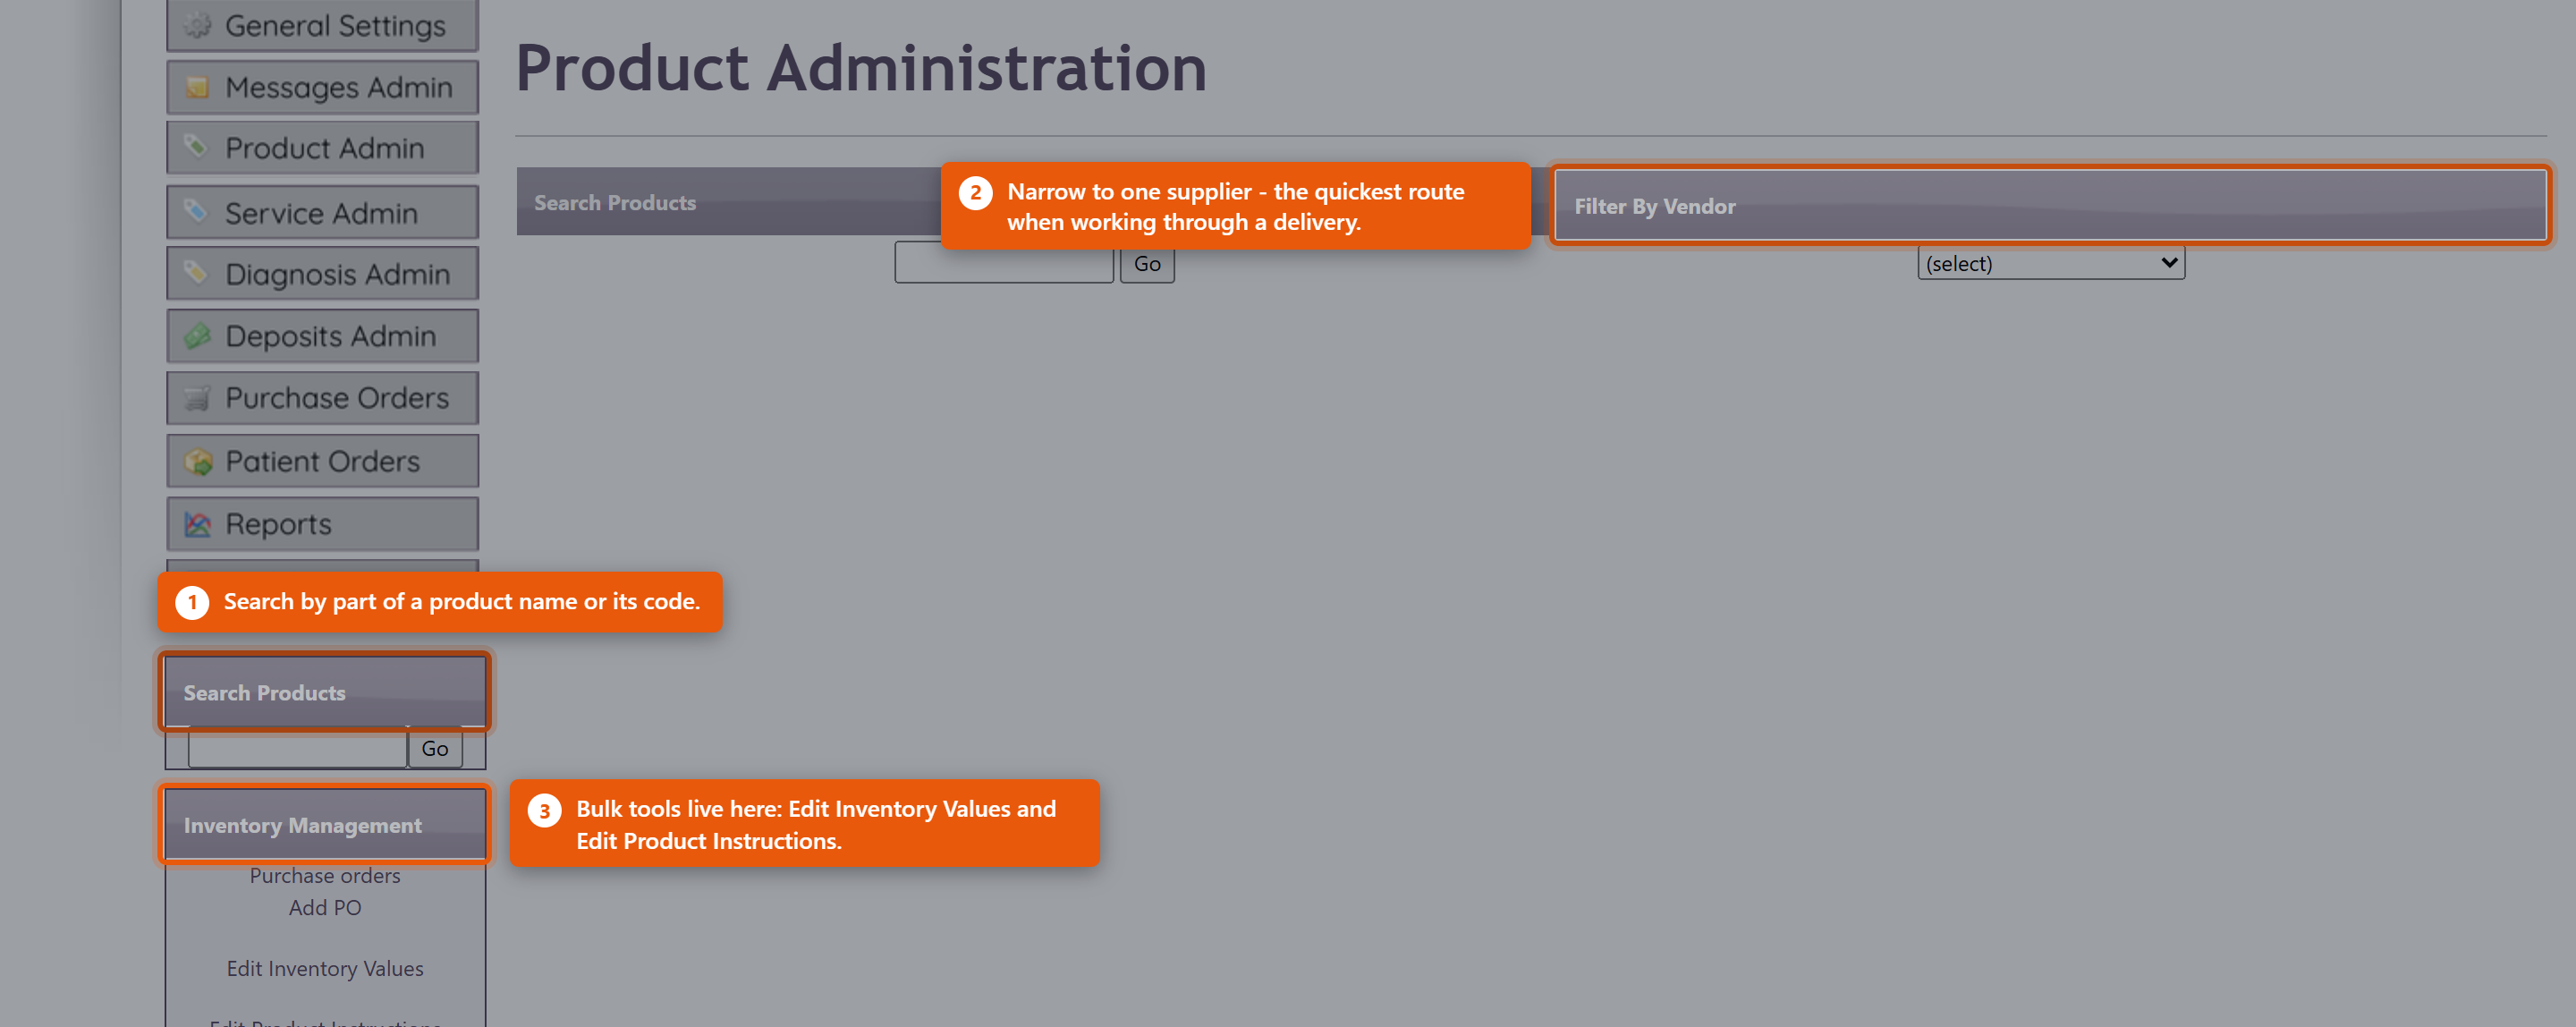 What a product record holdsOpening a product shows it in sections, and you do not need to complete all of them. Only the name, type and price are needed to sell something; the rest earns its keep in specific situations.
The clinical detailThe product record also carries Dosing Information, Recommended intake, Features and Benefits, Contra-indications and Inactive Ingredients. These are worth filling in for anything you dispense regularly. Contra-indications and Inactive Ingredients in particular are what a provider checks before recommending something to a patient with an allergy or an interacting medication - an empty field there is not neutral, it just means nobody can check. PricingThe Pricing section holds the Cost you pay and the Price you charge, and works out Margin and Markup from them. Average Cost is what the stock you are actually holding cost, which drifts from the current cost as you buy at different prices - it is the figure to use when valuing inventory. StockInventory Details shows On Hand and the Location the stock is kept in. Inventory Transactions lists every movement - what was purchased, received, sold and adjusted, and when. When a count is wrong, read the transactions before adjusting. The history usually shows what happened, and an adjustment made without understanding the cause hides the problem rather than fixing it. Set a Reorder Level on anything you keep in stock. The reorder tools use it to tell you what is running low, and a product with no reorder level simply never appears in those lists. Editing several products at onceThe Inventory Management panel on the left of Product Administration handles the jobs that span many products: Edit Inventory Values for counts and costs, and Edit Product Instructions for dosing text. Both are far quicker than opening products one at a time. Purchase orders and Add PO are in the same panel. Receive new stock through a purchase order rather than by adjusting counts - the PO records what you paid, which is what keeps Average Cost and your inventory value honest. Retiring a productMake a product you no longer sell inactive rather than deleting it. Deleting breaks the history of everything already sold; making it inactive takes it out of the lists while leaving past orders, invoices and reports intact. |
 |
|
| 30 |
Organising Your Product CatalogueOrganising Your Product CatalogueA catalogue of a few hundred products only stays usable if it is organised. Three things do most of that work: categories, vendors and keeping retired products out of the way. All of it lives under Product Admin on the Admin menu. CategoriesCategories group products for browsing - both for your own staff and for patients in the portal, where they are the main way anyone finds anything. Each category carries a sort order, so the ones you sell most can sit at the top rather than falling alphabetically. Keep them broad. A category holding two products is not helping anyone find anything, and a catalogue with forty categories is harder to navigate than one with eight. 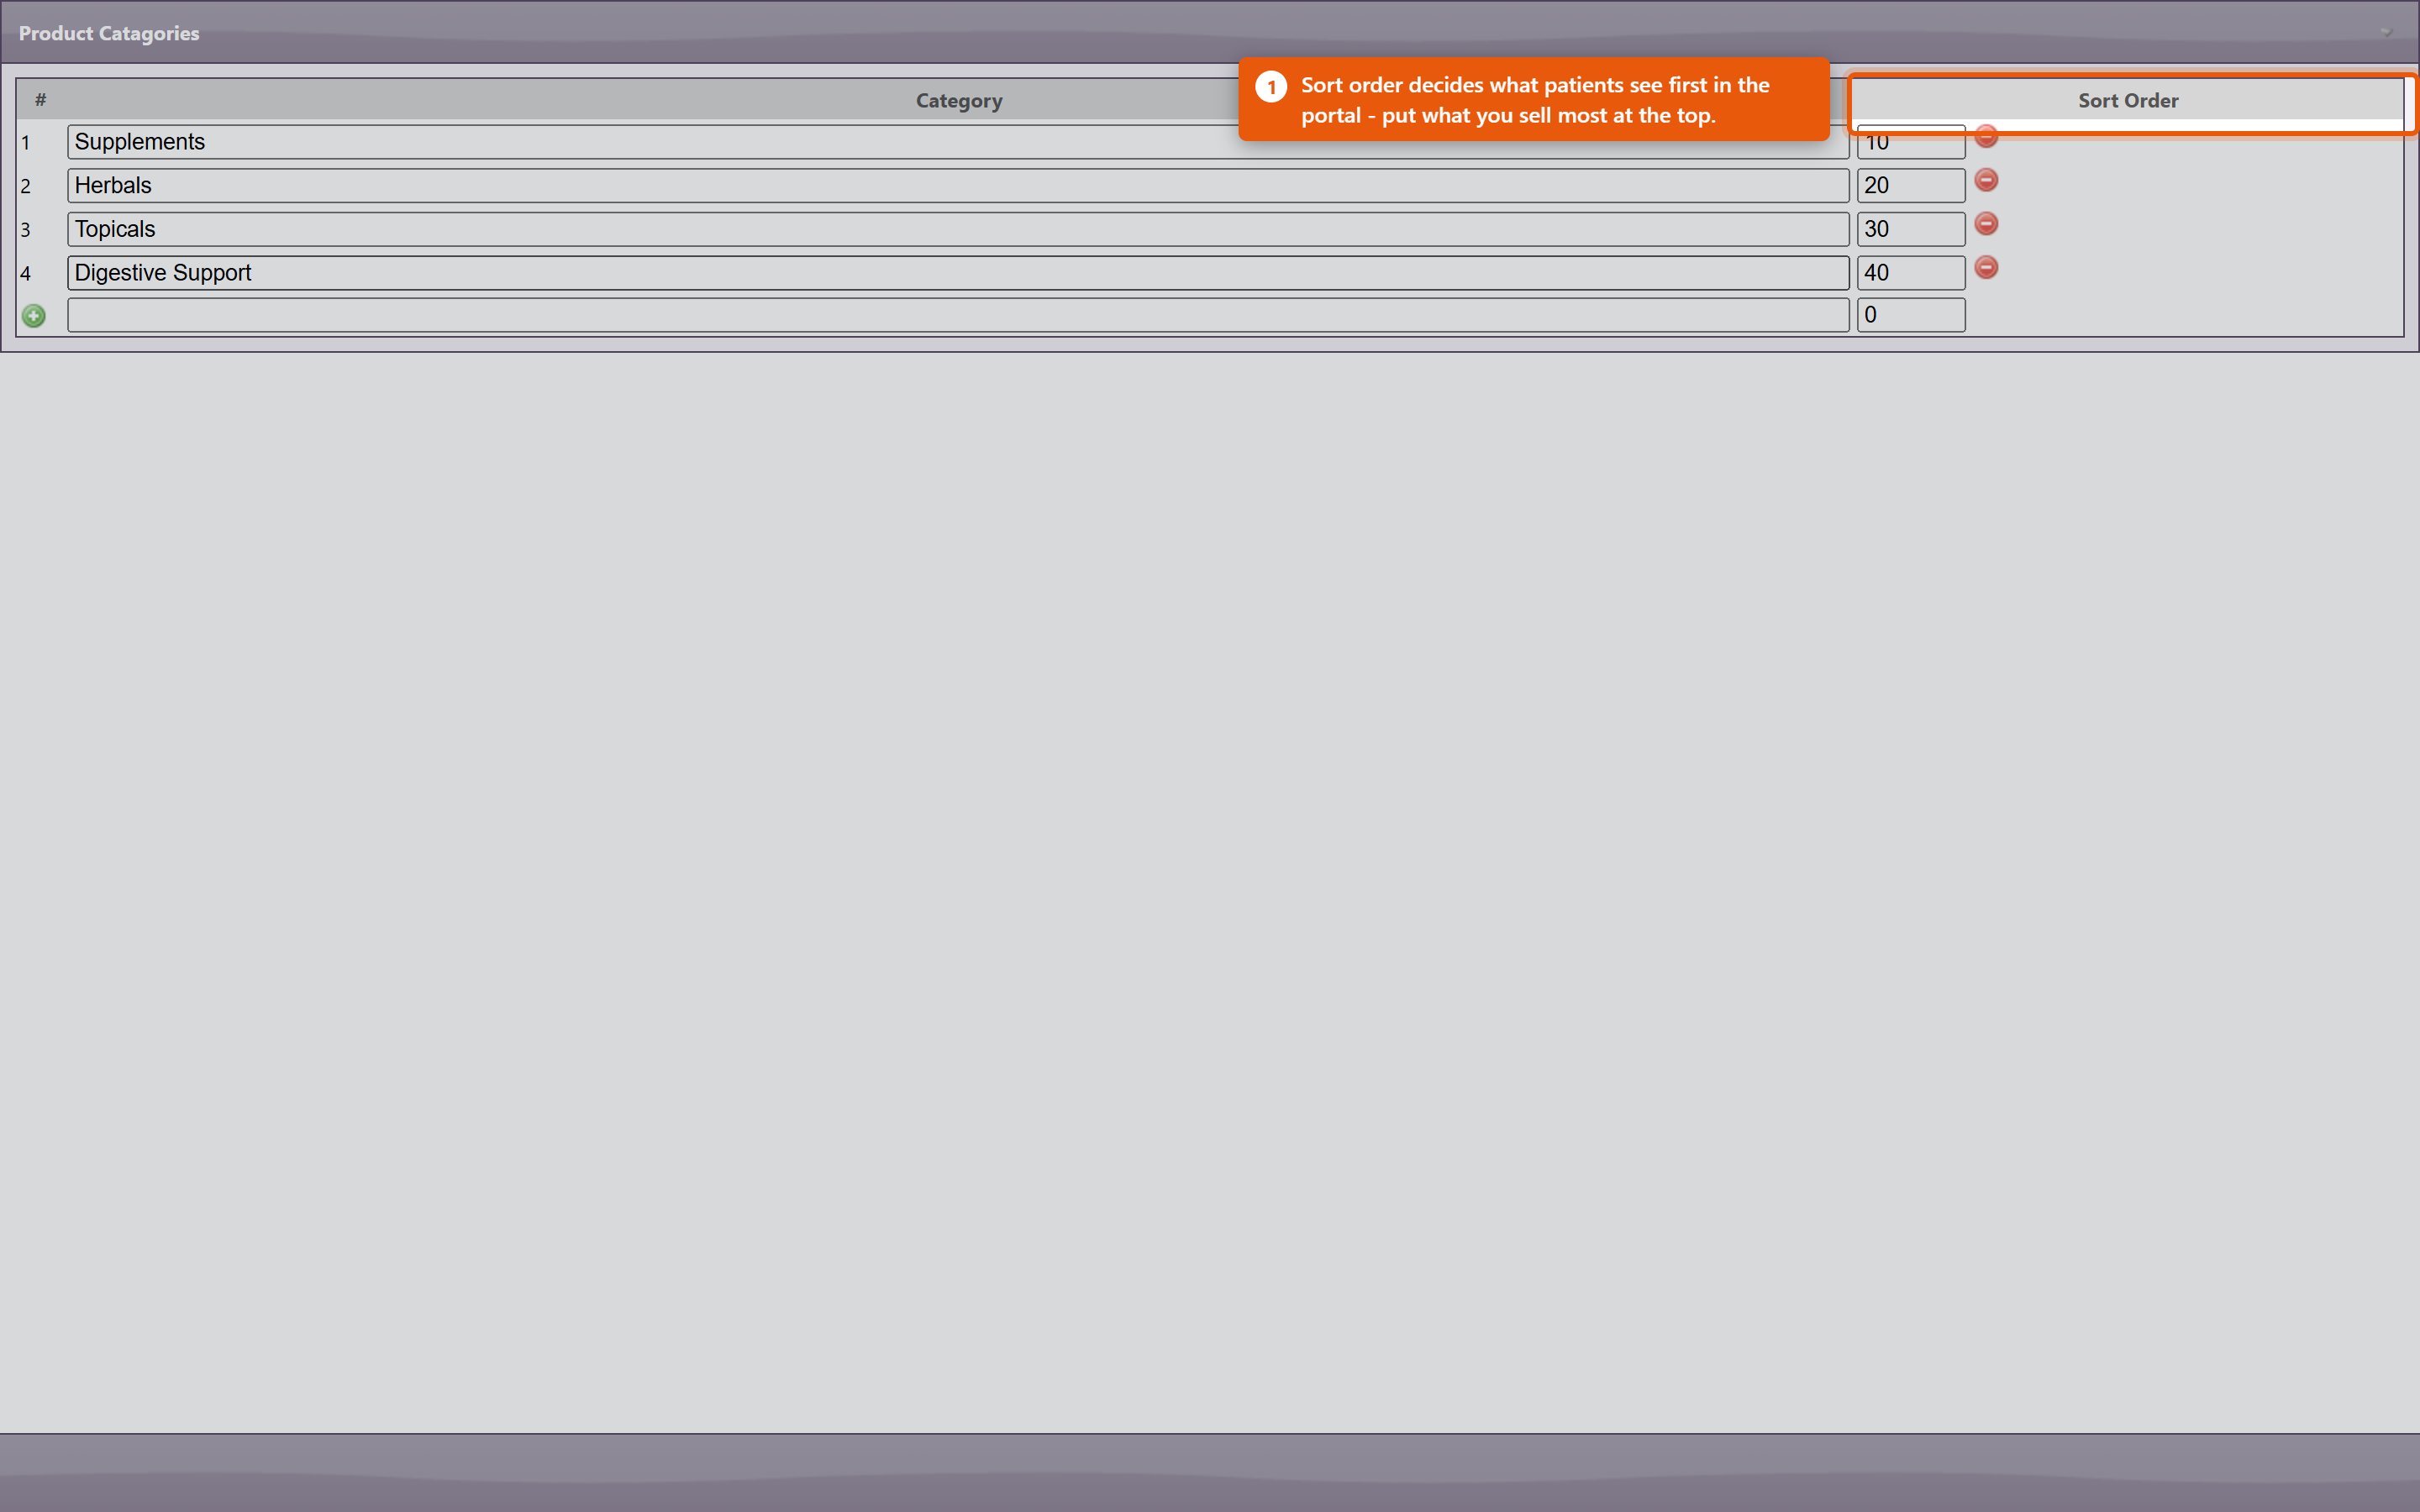 VendorsRecording the vendor on a product is what makes Filter By Vendor useful on the Product Administration page. That filter is how you work through a delivery, review one supplier's pricing, or find everything affected when a supplier discontinues a line. It also drives purchase orders: a product with no vendor cannot be ordered through the normal PO process. Finding things
Product codesProduct codes identify a product across orders, inventory and reports. Keep them consistent and do not reuse a code from a retired product - reports covering both periods will silently merge the two. DuplicatesDuplicates appear naturally: the same supplement gets added twice under slightly different names, or an import creates a second copy. They split your stock figures and your sales history, so the same product looks like two half-selling ones. The Duplicate Products report under Reports lists catalogue entries that look like duplicates. Work through it occasionally rather than waiting for the figures to confuse someone - and when you find a pair, make one inactive rather than deleting it, so the sales already recorded against it survive. Retired productsMake products you no longer sell inactive. They come out of the lists and out of the portal while everything already sold keeps its history. Deleting a product breaks that history, which is why it is almost never the right choice. Keeping it tidyA quarterly pass costs very little and prevents most catalogue problems:
|
|
|
| 74 |
Connecting Fullscript to OfficeProConnecting Fullscript to OfficeProConnecting Fullscript lets you pull their catalogue into your own product list and send patients a Fullscript plan without leaving OfficePro. It is set up once by an administrator, and then each prescribing provider is linked to their own Fullscript account. Fullscript needs ProductPro. Without that module none of these screens are reachable. 1. Connect the practice
When it has worked the section reads Your account is connected to Fullscript. Sign in with the account that owns your clinic's Fullscript dispensary, not a personal one - the connection determines whose catalogue and whose commissions you are working with. 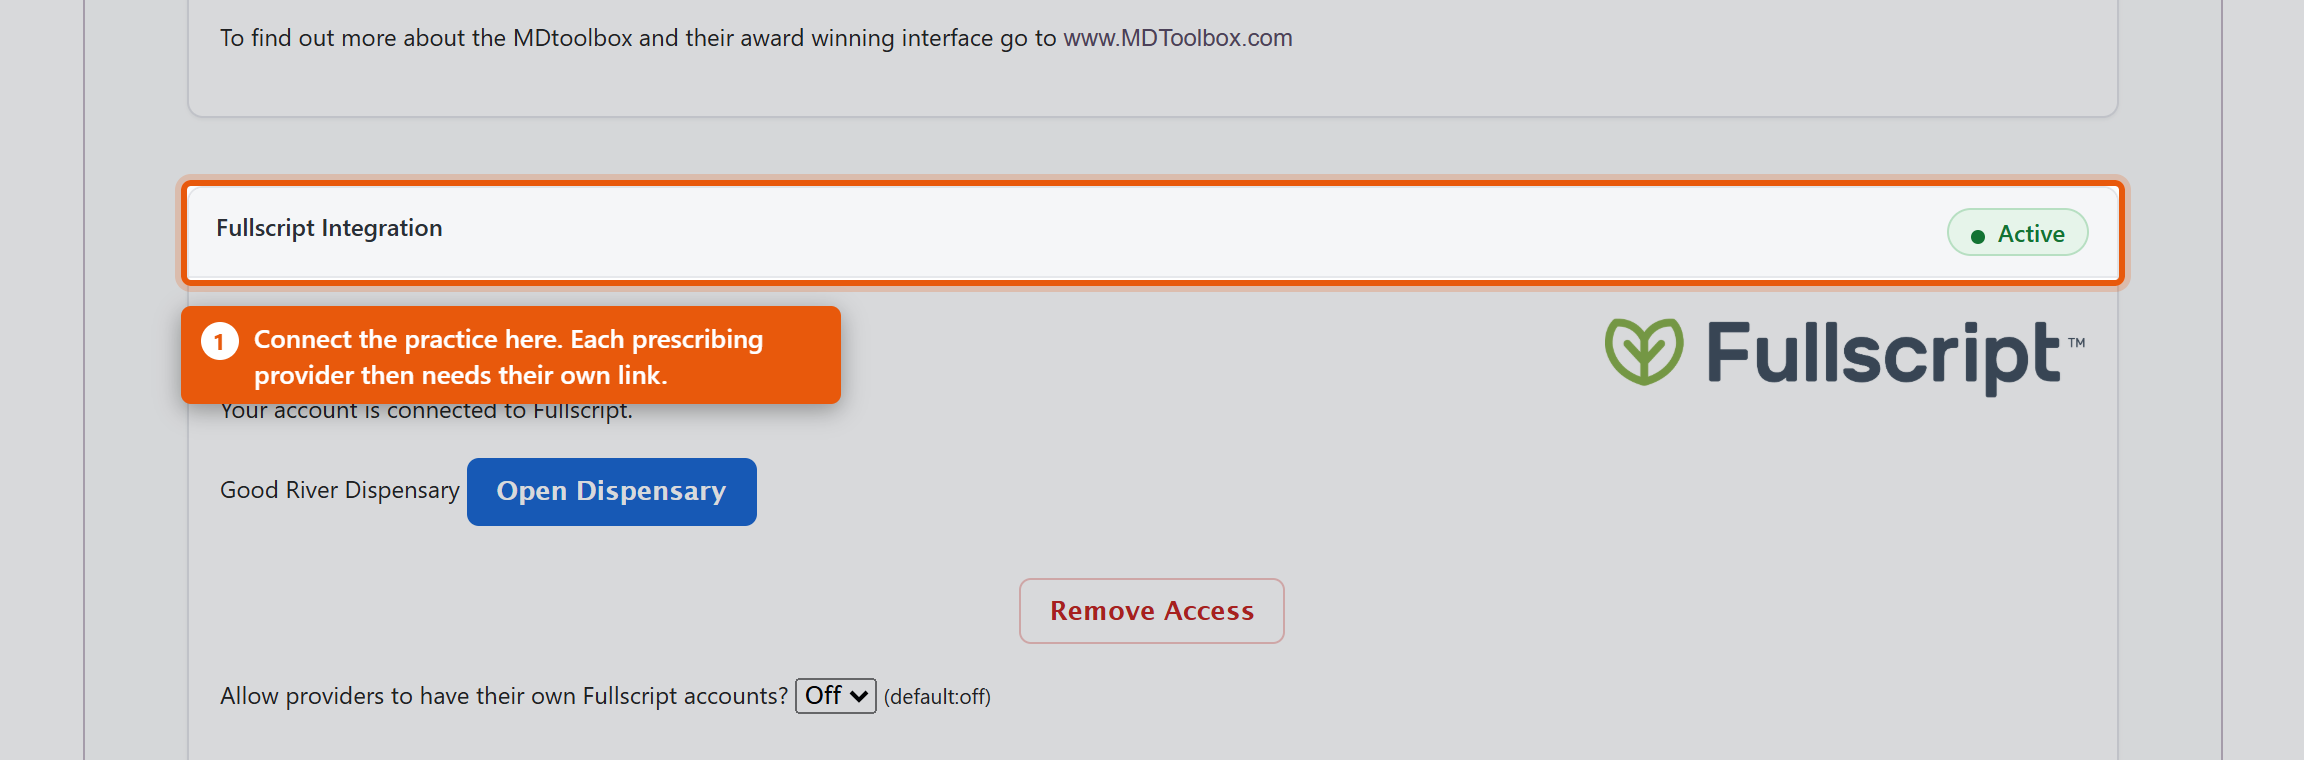 2. Link each providerConnecting the practice is not enough on its own. Fullscript plans are written by a named prescriber, so each provider needs their own link. Under Associate Providers with Fullscript you will see each OfficePro Provider against their Fullscript ID. Use Add to Fullscript for anyone not yet linked. A provider showing Assigned under another account has a Fullscript account already tied to a different dispensary - often their own from a previous practice. That has to be resolved with Fullscript directly; OfficePro cannot move it. 3. Decide how imported products should lookBefore importing anything, set the defaults in ProductPro settings. They apply only to products added from the Fullscript catalogue and never change products you already have.
DisconnectingRemove Access ends the connection, and the section then reads Your Fullscript access was removed. Products already imported stay in your catalogue - they are your products now - but they stop being refreshed from Fullscript and new plans cannot be written until you reconnect. Check it worked
|
|
|
| 84 |
Setting Up Auto-Orders and Subscribe & SaveSetting Up Auto-Orders and Subscribe & SaveAn auto-order is a standing arrangement to reorder a product for a patient on a fixed cycle. Each night OfficePro looks for plans that are due, creates the orders, and applies a recurring discount if you offer one. It bills patients on a schedule with nobody watching, so it is worth setting up deliberately rather than discovering how it behaves from a phone call. Before anything else: is it switched on?Auto-orders run for practices on BackOfficePro. This is part of your subscription, not a setting inside OfficePro - you cannot enable it yourself. If you are not on BackOfficePro you can still record auto-order plans, and nothing will ever generate from them. If you are unsure, ask support before you set expectations with a patient. Set your discountsIn ProductPro settings there are two:
Both are set in 5% steps up to 30%. Leave either at 0% to offer no discount. Work the ongoing percentage out before you set it. On a monthly subscription, 10% off is 10% off twelve times a year, on a product you have already discounted to a dispensary price. Set the shipping and the notification
When the orders appearThe job runs once a day, late in the evening Pacific time. Orders created overnight are waiting the next morning as Pending, alongside everything else in your patient orders queue - they are ordinary orders from that point on, and are picked, packed and completed the same way. It looks a short way ahead as well as behind, so a plan due in the next few days is picked up early rather than exactly on its date. A plan that is overdue produces one order, not one for every cycle it missed. Decide your refill policyEach product on a patient can carry a refill constraint:
For anything a provider wants to review before it keeps going out, set a refill count or an end date on the plan. An auto-order with no end runs until somebody stops it. A different feature with the same nameVendors have auto-orders too. On a vendor's contact record, Auto Order raises a purchase order to your supplier on a cycle - the record will say This vendor is set to auto order every so many days. It restocks your shelves; it has nothing to do with patient subscriptions and no patient is billed by it. Check it before you rely on it
|
|
|
| 31 |
Managing Product Inventory in OfficeProManaging Product Inventory in OfficeProTo effectively manage your product inventory, utilize the Product Admin area in OfficePro. Accessing Product Admin
1. Inventory ManagementThe Inventory Management view assists with conducting periodic physical inventory counts and offers ongoing access similar to the initial setup with the Add Starting Inventory list.
2. Reorder ListThe Reorder List highlights products that have reached an inventory level requiring reordering.
Additional ResourcesTo learn more about setting up your products in OfficePro, refer to the Knowledge Base articles on Adding and Editing Products, Product Lists, and Inventory Setup. |
|
|
| 43 |
Setting Up Your Inventory in OfficeProSetting Up Your Inventory in OfficeProAccurate inventory management is crucial for ensuring you have the right products available for patient encounters. Here’s how to set up and manage your inventory effectively. Importance of Inventory Setup
Adding Starting InventoryAccess the Add Starting Inventory Feature:
Initial Inventory Setup:
Entering Opening Counts:
Review and Save:
Ongoing Inventory ManagementAfter the initial two-month setup period, you can continue to manage your inventory using the Inventory Management view. This view allows for periodic adjustments and helps you maintain accurate stock levels over time. ConclusionSetting up your inventory accurately in OfficePro is essential for ensuring smooth operations and effective patient encounters. By utilizing the Add Starting Inventory feature and making sure your counts are correct, you’ll reduce the likelihood of stock discrepancies and enhance your practice's efficiency. If you have any questions or need further assistance with inventory management, feel free to ask! |
|

 icon on the top right of the list.
 (edit) in the Clinic Rooms & Resources area; this will open the “Edit Clinic Resource” screen
 (delete)