NS - Knowledgebase
Find the answers you need. More articles every week.
| ID | Title | Module | Category |
|---|---|---|---|
| 1 |
Logging in to OfficeProLogging in to OfficeProThere are several URLs that you can use to access the OfficePro service. Each URL is associated with a different version of the service so that you can access the service from multiple locations for redundancy and failover. There are 2 layers of authentication when login to the OfficePro service. First, you must authenticate at the practice level and then again at the user level. Service URLsBeta Service URL
Practice Level AuthenticationWhen you first access the service you will be asked to authenticate at the practice level. Each practice will use its practice name (as specified by NatuaSoft when configuring your account) and a unique practice pass. To obtain your practice and practice pass ask your account administrator or look for your welcome email from NaturaeSoft. You can also request that your practice login credentials be sent to the emails on file with your account by contacting support through the chat widget or by emailing support@naturaesoft.com. 
|
 |
|
| 68 |
Selling and Redeeming Gift CardsSelling and Redeeming Gift CardsA gift card holds a balance the practice has already been paid for. You sell one, the customer pays for it like anything else, and the balance is then spent against future visits - by whoever holds the card. There is nothing to switch on. The tools are on the encounter, on the patient record, and on the Admin page under Gift Cards. Sell or load a card
The card is added to the visit as a line to be paid for, and the customer settles it with the encounter like any other charge. It is not funded until that payment is taken. The same screen loads more value onto a card that already exists - enter the existing Card UID and the amount to add. Redeem against a visit
The amount comes off the visit and off the card together. Anything left stays on the card for next time. Check a balanceUse Check Gift Card Balance to read a card without touching a visit - the right tool when someone rings up to ask what is left. Gift Card Store Value on the patient record shows the cards linked to that patient, and View full transaction history shows every load and redemption with the balance after each. 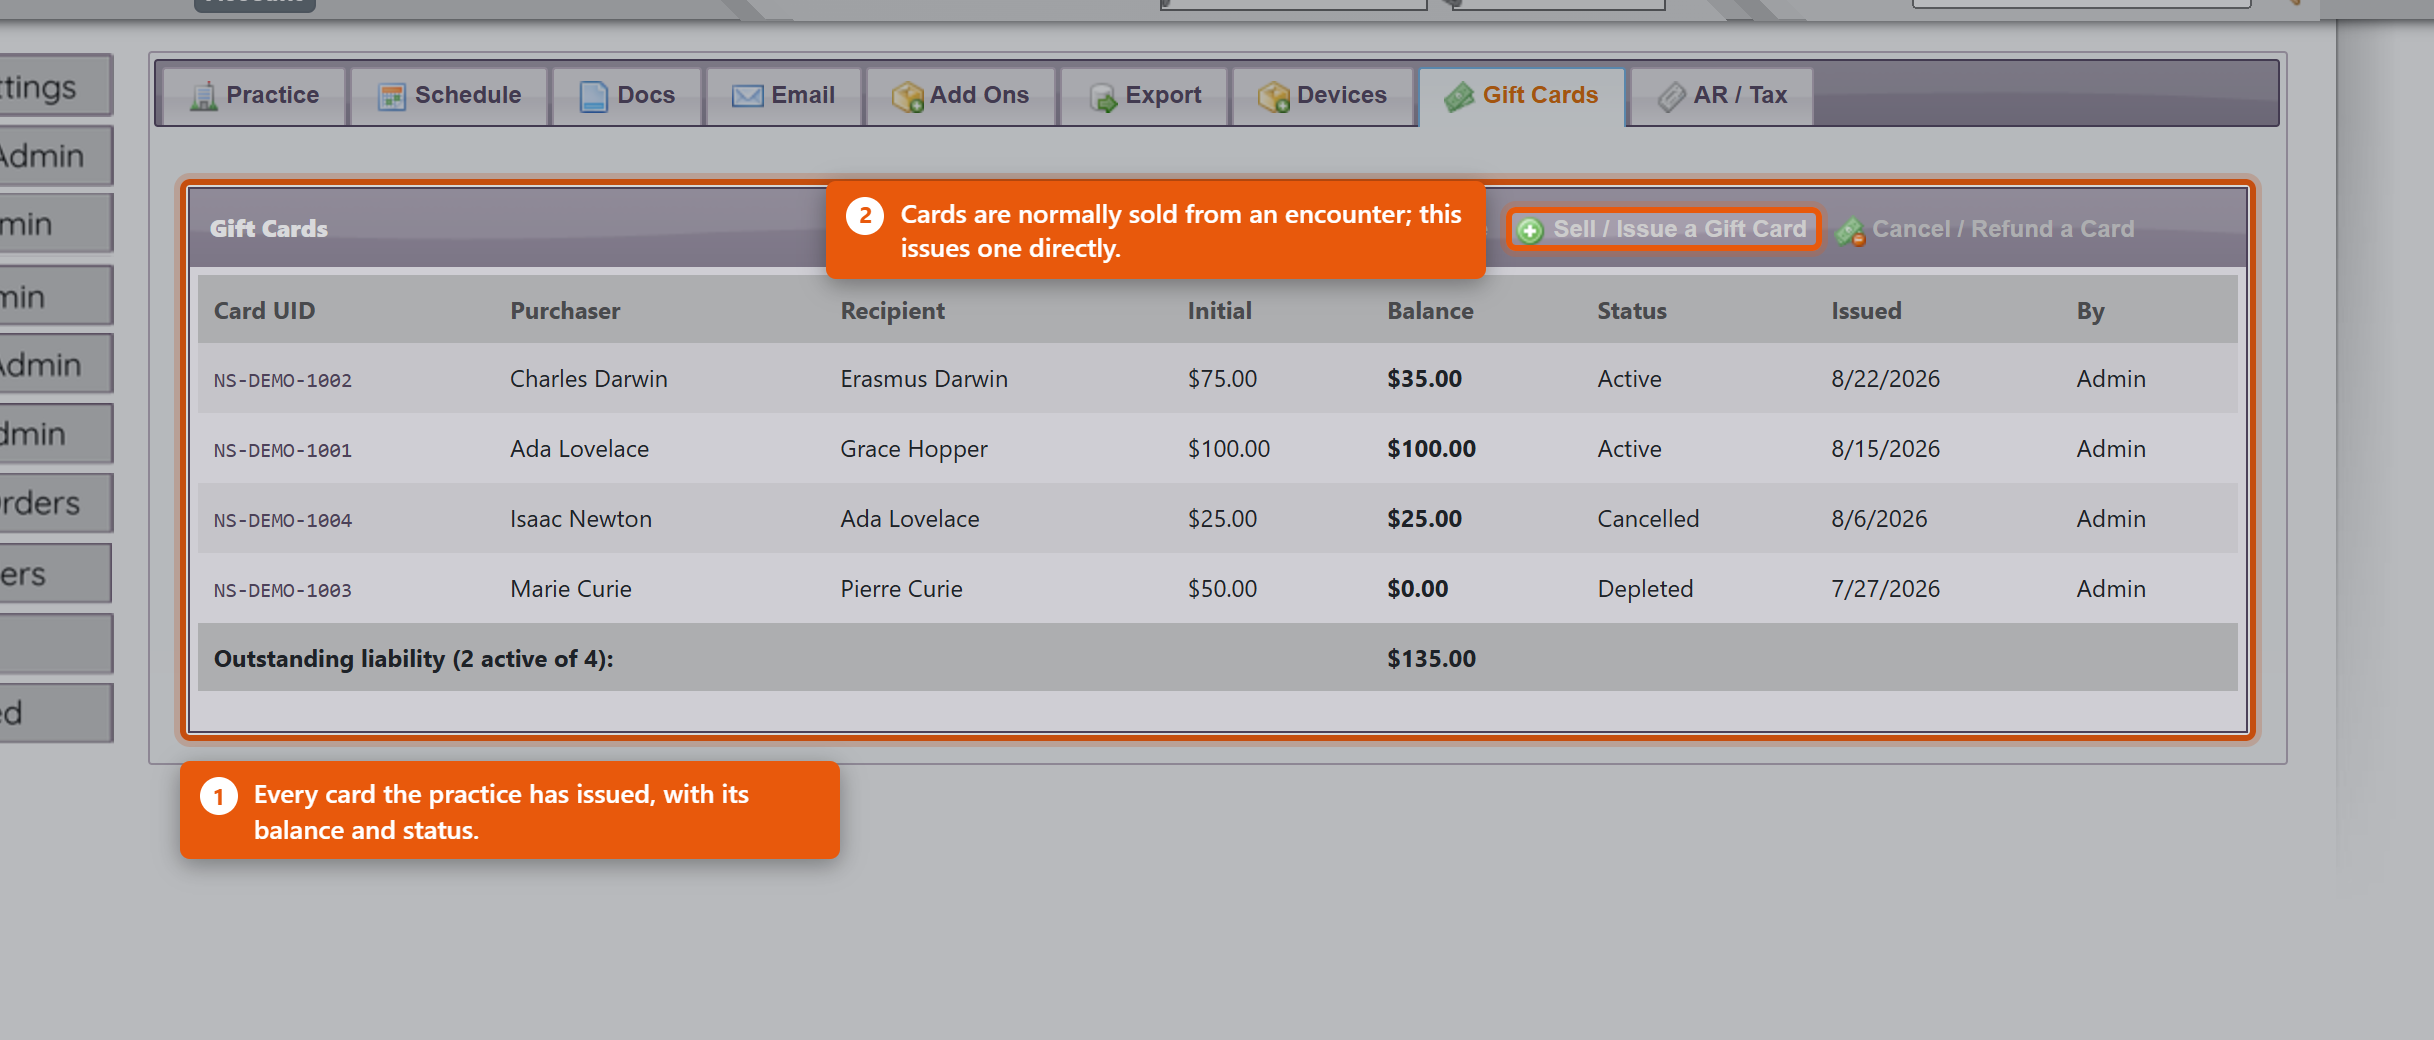 Where the money appears in your reportsThis surprises people, so it is worth understanding once. The revenue is recorded when the card is sold, not when it is spent. Selling a $100 card puts $100 of revenue in the day it was bought. When that card is later redeemed against a visit, the redemption settles revenue you have already recorded rather than adding more. So a redemption is not a discount and not a new payment - it is the customer spending money you were already paid. If it added to revenue again, the same $100 would be counted twice: once when bought, once when used. What this means day to day:
Practical points
|
|
|
| 3 |
Adding a VisitAdding a VisitThe OfficePro service is visit-centric in that everything revolves around visits. There are several ways to add a visit to your schedule. 
Depending on where you click to add a visit, some of the details of the Add Visit form will be filled out for you. For example, if you click on the Add a Visit link from the patient detail page the patient will already be specified on the form. If you double click on an empty space in your calendar's graphical views the Add Visit form will have the date and time of the visit already set and if you are logged in as a provider the visits will be assigned to you as the provider.  The Add Visit FormIn order to add a visit you will need to specify its details including the Patient, Provider, CC (chief complaint or chief concern), Visit Type, Date, Time, Duration, and Visit Notes. You can also specify if you want to alert the patient about the visit via email and text once the visit is saved. Note: When updating the visit type the visit duration is automatically updated to the default duration set for that visit type. Rooms & Resources TabIf your practice has multiple rooms or other resources set up, you can assigned them to the visit. From the Add window you can only specify one room for the visit. To add more rooms click the Add and Edit Visit button once the details have been set and you can assign further resources to this visit from the Edit Visit window. OfficePro offers several convenient ways to add visits to your schedule, allowing flexibility from various screens. Methods for Adding a Visit
If you haven’t selected a date from the schedule, you will be prompted to choose one from the pop-up calendar. If the calendar or Add Visit window does not appear, ensure your pop-up blocker is disabled. Completing the Add Visit WindowOnce the Add Visit window appears, you can fill out the essential appointment details.
Next, follow these steps:
Rooms and Resources TabIn the Rooms and Resources tab, you can adjust how the visit is displayed on both the provider’s and room’s schedules.
If you need to add additional rooms or resources to the visit, you can do so in the Edit Visit window after saving the appointment. Finalizing the VisitOnce all the necessary details are entered, click Add Visit.
Post-Visit ActionsOnce the visit is added, it will appear on your schedule. From here, you can:
For more details on configuring visit types, providers, rooms, and resources, refer to the first three Configuration videos. To learn about scheduling recurring visits, please see the Knowledge Base article titled “How to Schedule a Recurring Visit.” |
|
|
| 4 |
Editing VisitsEditing VisitsYou can edit any visit by double-clicking on the visit in any graphical view and from the top right corner of the resulting Visit Details page you will see an edit button  The Edit Visit WindowFrom the Edit Visit window you can change the visits Provider, Reason, Type, Date, Time, Duration, Visit Notes and choose to alert the patient with an email and SMS upon save of the visit details.
|
|
|
| 25 |
Scheduling a Series of Recurring VisitsScheduling a Series of Recurring VisitsIf you need to schedule recurring visits for a patient, you can do this in one simple step by using the Add Recurring Visit feature. Follow the steps below to set up a series of visits efficiently. Accessing the Add Recurring Visit Feature
Entering Basic Appointment InformationThe fields in the Add Series of Visits window are similar to those in the regular Add Visit window.
Next, select the provider and room for the visits from the respective drop-down menus. Setting the Date and Time RangeInstead of selecting a single date, you’ll set a Date Range:
The Start Time field shows available time slots in five-minute increments. Times outside the range of 6:00 AM to 10:00 PM are greyed out and cannot be selected. The visit duration is determined by the Visit Type you select (e.g., a consultation may default to 15 minutes). You can adjust the duration manually as needed. Additional Fields and Settings
Select the weekdays for the recurring visits by checking the boxes for the desired days (e.g., Monday, Wednesday, Friday). If the starting date doesn’t match the selected weekdays, the first appointment will occur on the next available day. For instance, if your date range is the month of June and you select Tuesdays, the first appointment will fall on the first Tuesday in June. To add additional rooms or resources, you can do so later in the Edit Visit window after the appointment series has been saved. Finalizing the Recurring VisitsOnce you’ve entered all the necessary information, click Add Series to save the appointments.
Post-Setup ActionsAfter the series of visits is added, each visit will appear on your schedule. You can:
For more information on setting up visit types, providers, rooms, and resources, refer to the Configuration video tutorials. |
|
|
| 26 |
Adding a Meeting to the OfficePro ScheduleAdding a Meeting to the OfficePro ScheduleScheduling a meeting in OfficePro is very similar to scheduling a visit. Follow these steps to easily add a meeting to your schedule. Adding a Meeting
Selecting a DateChoose the desired date from the pop-up calendar to open the Add Meeting window. Meeting DetailsIn the Meeting Details tab, you can:
Rooms & ResourcesIn the Rooms & Resources tab, you can:
Once all details are entered, click Add Meeting to save and add it to the schedule. Uses for MeetingsMeetings are useful for blocking out time on providers’ schedules for various reasons, such as:
To schedule a recurring meeting, click the link icon next to Meeting in the Add menu. Blocking Out Whole DaysFor full-day or multi-day events, use the Holiday feature, which can be set up in the Schedule Settings tab of Admin General Settings. For more detailed information on setting up meeting types, watch the configuration video on Schedule Settings. |
|
|
| 32 |
Managing Payments, Discounts and Write-OffsManaging Payments, Discounts and Write-OffsMoney is taken against an encounter, in the Payments & Discounts area. Everything a patient owes, pays, or is forgiven is recorded there, and everything is recorded against a code so it can be reported on later. Taking a paymentEnter the payment type into the payment search box - either its code or its name, so both CA and Cash find the same thing. Then enter the Amount. The usual types are Cash, Check, Credit Card Payment, ACH Payment and Insurance Payment. Depending on the type you will be asked for a Check Number, an Approval Code or an Auth Number - fill these in. They are what lets you match a payment to a bank statement or a card settlement three months later, and reconstructing them afterwards is painful. Receiving Agent records who took the money, and Payment Note is free text for anything unusual about it. Discounts and write-offsDiscounts go in the same way, through the Discounts & Adjustments search box. Choose from Common Discount Percentages saves working out the arithmetic for a standard percentage off. Practices typically have Doctor Discount, Family Discount, Senior Discount, Trade, Insurance Adjustment and Write Off. They behave identically in the software - the difference is entirely in what they tell you afterwards. That difference matters more than it looks. A Senior Discount is a pricing decision you chose to make; a Write Off is revenue you failed to collect; an Insurance Adjustment is the difference between what you charged and what the payer allows. All three reduce the balance by the same amount and mean completely different things about how the practice is doing. Using Write Off as a catch-all makes the Discounts Given report useless. The available codes are fixed for the practice. If you need one that does not exist, contact NaturaeSoft support rather than pressing an existing code into service - the code is what the reporting is built on. Payments have to be allocatedThis is the part that most often causes confusion. Taking a payment and applying it to a visit are two separate things. A payment can sit unallocated - the patient has paid, but the money has not yet been attached to what it was for. Use Allocate Payment to spread a payment across visits. The screen shows the payment's Available amount, a list of Visits with Outstanding Balances, and what each visit's balance Becomes once you apply the amount you have entered. Unallocated: shows what is left over. A single payment can be split across several visits, and one visit can be settled by several payments. That is normal - a patient paying off an account in instalments produces exactly that. Unallocated Payments lists money taken but not yet applied. Work through it regularly. An unallocated payment makes the patient look like they still owe money they have already handed over, which is how a practice ends up chasing someone who has paid. Credits and refundsA patient can end up in credit - they overpaid, or a return put value back on their account. Credit can be left to cover a future visit or given back with Process Patient Refund. Decide which before allocating anything. If you intend to refund a credit, do not allocate it against a payment first - allocate it and it has been spent, and the refund becomes a separate piece of work. Returns work differently, and it is worth knowing whyReturning a product does not create an ordinary credit. It records a credit of $0.00 and puts the returned value on the return visit as a negative amount. That negative is not a side effect - it is the credit. So if you are looking at a return in the allocation screen and see a negative row, leave it alone. Removing it would delete the credit and leave the return visit unpaid at the same time. OfficePro blocks that and explains why if you try. To take a credit back so it can go somewhere else, untick the visit you applied it to. If the return itself was the mistake, reverse the return rather than its credit. Good habits
|
|
|
| 8 |
Creating a DepositCreating a DepositA deposit groups the payments you are banking together so that what OfficePro shows matches what appears on your bank statement. Without it you have a list of individual payments and a bank line for the total, and no way to tie one to the other. Create a deposit
The list can be narrowed by period - Today, This week, Last Week, This Month and so on - which is the quickest way to find the payments for the day you are banking. Group payments the way the bank will see them. Cash and cheques banked together belong on one deposit; card settlements arrive separately and belong on their own, or the totals will never line up. 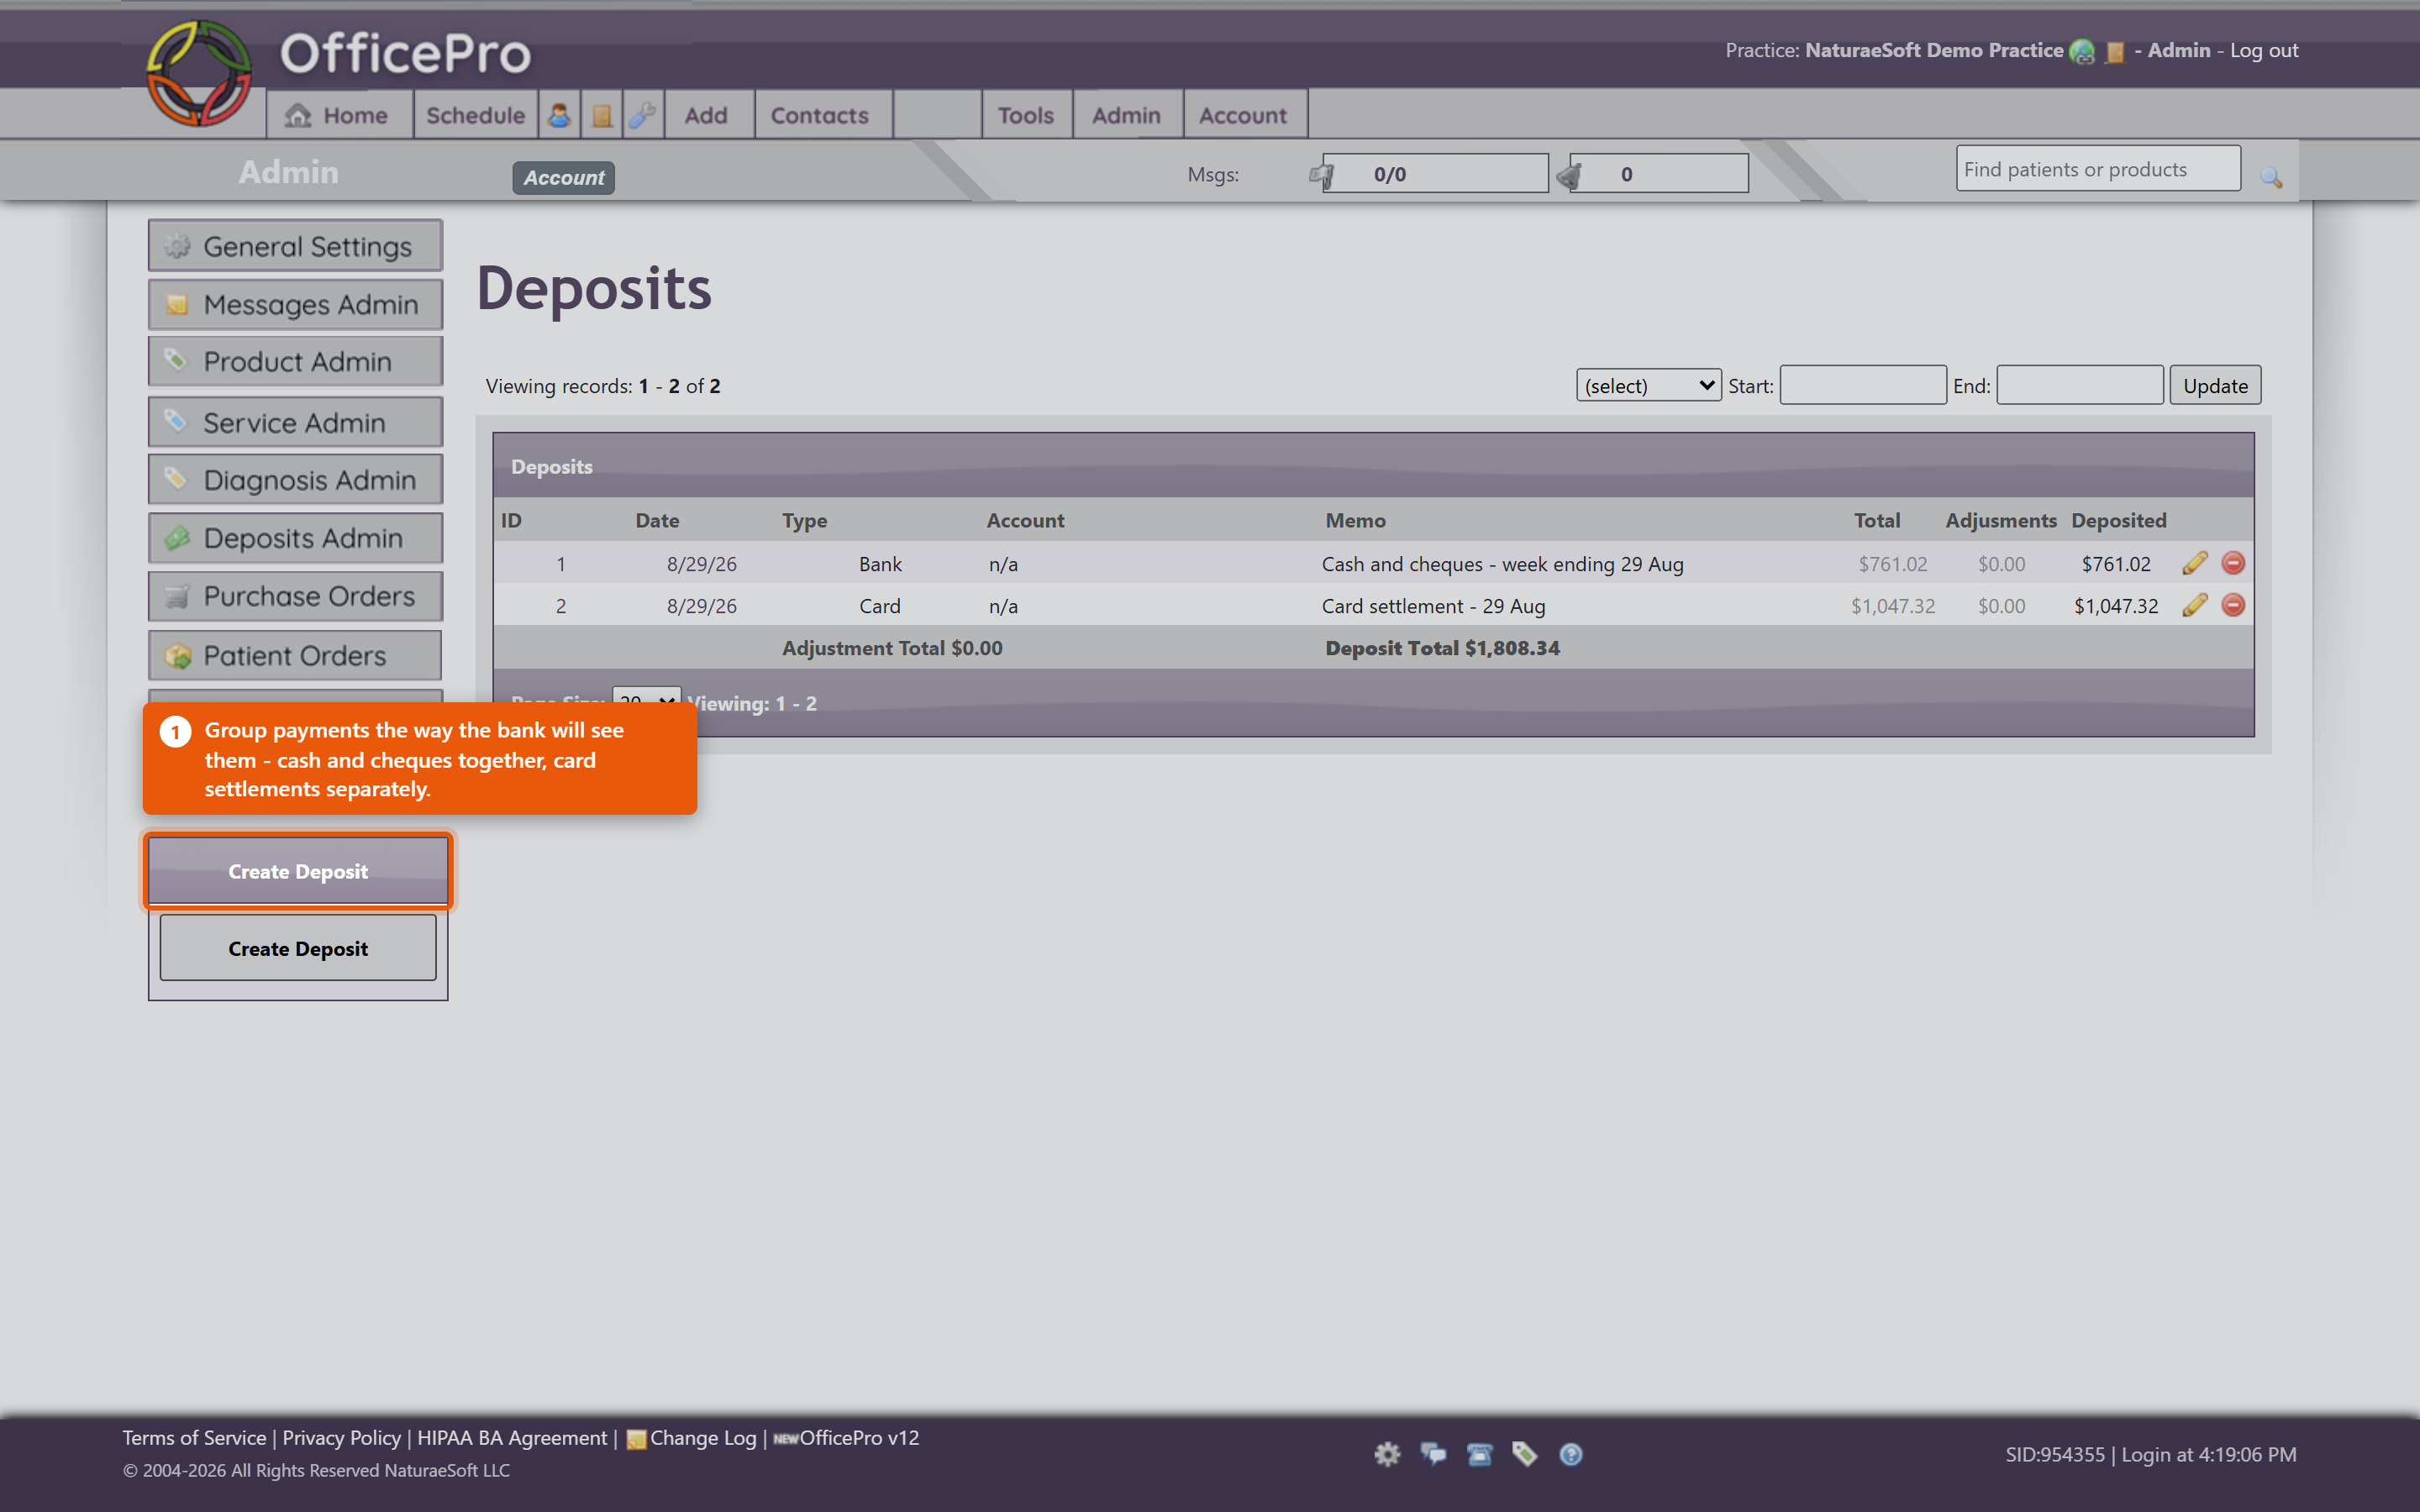 When the total does not matchUse Deposit Adjustment and enter the Adjustment Amount - for a bank fee, a rounding difference, or a cheque returned unpaid. Record what it was for. An unexplained adjustment is indistinguishable from an error when someone reviews it later. Remove Payment takes a payment back out if it was included by mistake; it returns to the list of unbanked payments rather than being deleted. Print the slipProduce the deposit slip for the bank, with Payee and Memo as needed. You will see Deposit Slip Created Successfully when it is generated. Take the printed slip to the bank with the money. Auto Create DepositsAuto Create Deposits builds deposits from unbanked payments rather than ticking them by hand. It saves time for a practice banking on a regular rhythm - but check what it produced before printing, because it groups by its own rules and not by what is physically in your hand. Habits that keep it reconciled
Deposits cover money leaving your hands for the bank. Whether each payment is attached to the right visit is separate - see Managing Payments, Discounts and Write-Offs. A payment can be correctly banked and still not allocated to a visit, which is why a patient can appear to owe money they have already paid. |
|
|
| 79 |
Sending a Bulk MessageSending a Bulk MessageOpen Bulk Messaging in BackOfficePro. A campaign is built in four parts - who it goes to, how it is sent, what it says, and when. 1. AudienceChoose the Tags that describe who should receive this. Match decides how several tags combine:
The Recipients count updates as you choose. Read it before going further. It is the one number that tells you whether the audience is what you meant - a campaign intended for a dozen people showing four hundred recipients is a mistake you want to catch here rather than afterwards. No deliverable recipients. means nobody in that audience has a usable address or number, so there is nothing to send. 2. ChannelsChoose Email, SMS, or both. Sending both means a patient with an address and a mobile gets two messages, which is right for something important and irritating for anything routine. Texting needs a provisioned SMS number - see Bulk Messaging and Your SMS Number. 3. What it saysEmail Message takes a Subject and a Body, and Preview email shows it as the patient will receive it, in your practice branding. SMS Message is plain text and should be short - texts are read on a lock screen. Merge fields personalise each message. {FirstName} is the common one, and the placeholder on screen shows the shape: Hi {FirstName}, .... A merge field spelled wrongly does not error - it goes out literally, to everyone. This is the single most common way a bulk message embarrasses a practice. 4. Test, then scheduleSend Test Email and Send Test SMS send one to you. Do this every time, even for a small change. It is the only step that catches a broken merge field, a subject line left as a placeholder, or a text that reads badly on a phone. Then choose When to send, or Send now. Either way the campaign is queued and sent within your practice's send window - so "now" can mean "when the window next opens". Watching it goRecent Campaigns lists what you have sent, and Campaign Detail shows Progress as the queue drains. A campaign sitting at zero is usually waiting for the send window rather than failing. Start Another begins a new campaign. Habits worth having
|
|
|
| 29 |
Using OfficePro ReportsUsing OfficePro ReportsReports live under Reports in OfficePro. The list on the left is the whole set - if a report is not there, it is not hidden further in, it is either retired or not available to your account. There is a Find a report... box at the top of that list; typing two or three letters is usually quicker than reading it. 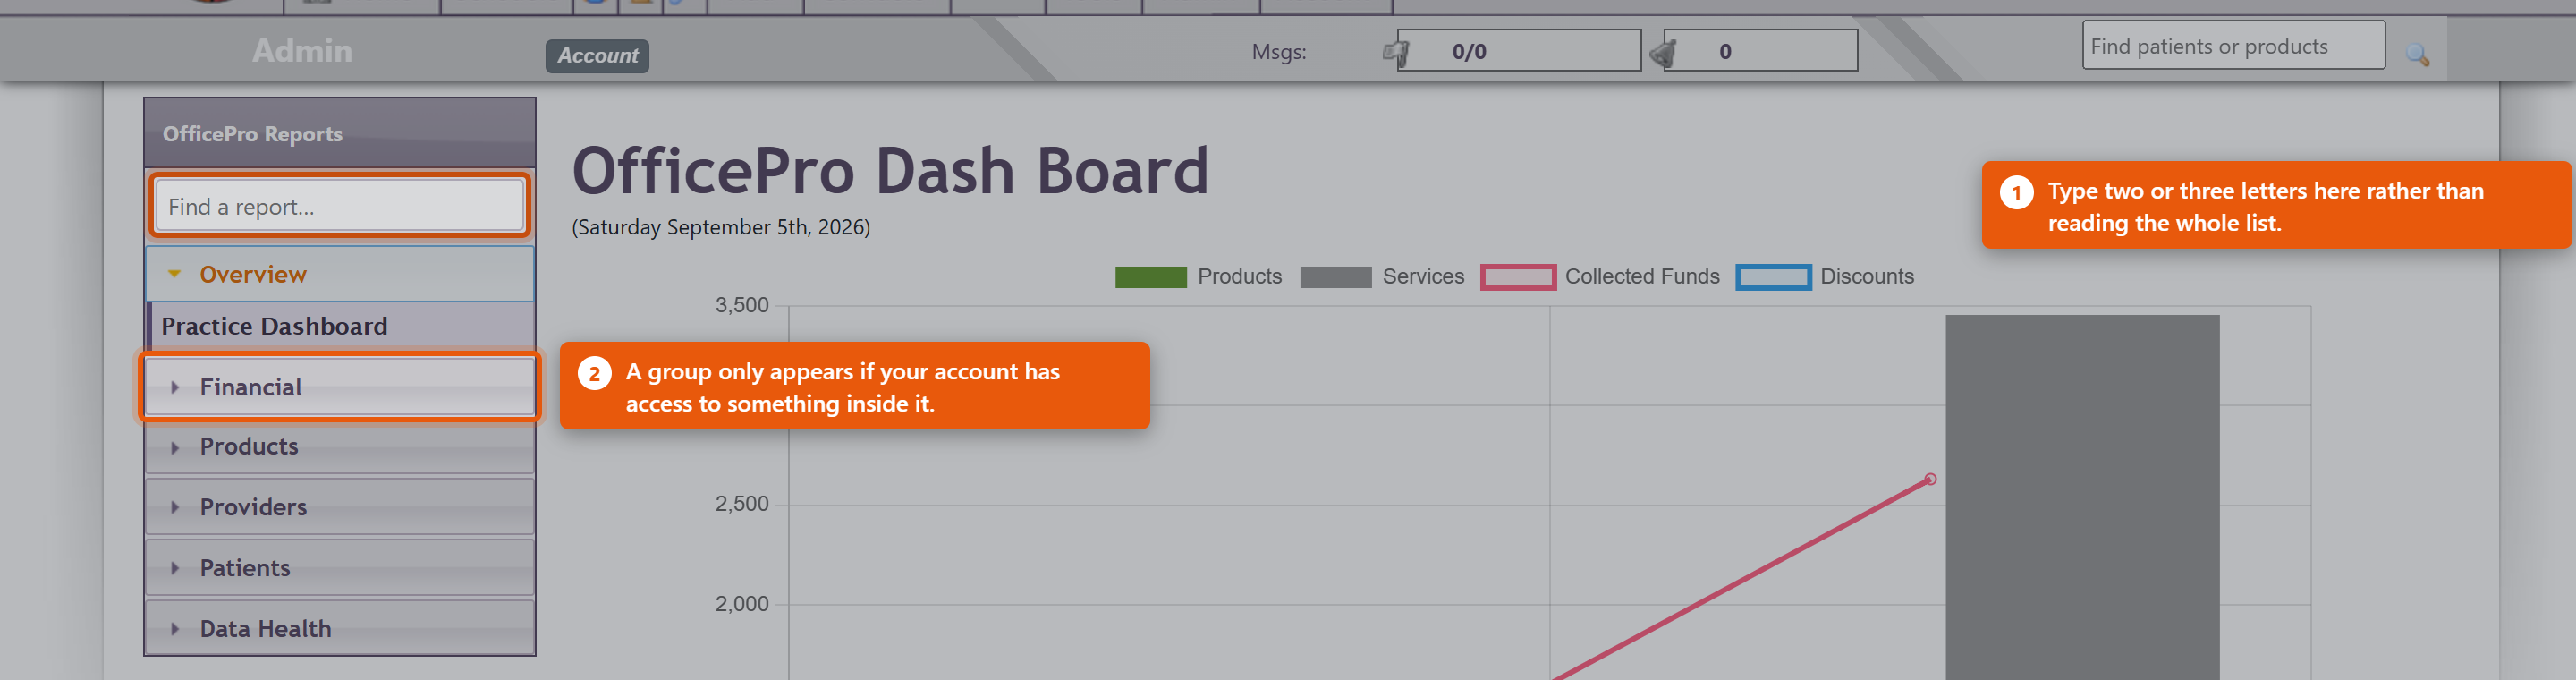 How reports are grouped
You will not see every group. A group only appears when your account has access to something inside it, so two people at the same practice can see different lists. That is the permission working, not a fault. The three Master ReportsThese are the same figures at three depths, and picking the right one saves a lot of scrolling:
Start at Summary and go deeper only when a number needs explaining. Choosing the periodMost reports open on the current month. The period bar at the top offers today, yesterday, this week, last week, this month, last month, this quarter, last quarter, this year and last year, plus Custom for any two dates. Some reports have no period bar at all, and that is deliberate. Patients with a Balance Due, Patients with a Credit, Subscription Health and the duplicate-finding reports describe how things stand right now rather than what happened between two dates. A date range would not mean anything on them. Getting the numbers outWhere a report can be exported, the action sits at the top of the report. Sales Tax, Sales Tax - Line Detail, Discounts Given, Unbilled Services, Subscription Health and Provider Productivity export to CSV, which opens in Excel or Numbers. Any report can be printed to PDF. Export before you change the period if you want both - the export always reflects what is on screen. Following a number to its sourceSeveral reports drill through. Clicking a figure on the Practice Dashboard opens the report behind it; the Master Reports step from Summary to Standard to Detailed; and Sales Tax opens Sales Tax - Line Detail, which lists every taxed line making up the total. That detail report is reachable only by drilling into it, which is why you will not find it in the list on the left. This is the fastest way to answer "why is that number what it is" - keep clicking until you reach the encounter. What providers seeA provider opening a provider report sees their own figures. Only accounts with financial or administrator access can select a different provider. So a provider reporting that they cannot see a colleague's numbers is describing the system working as intended. If a report you used to run is not listedThe reports section was rebuilt in August 2026 and a large number of old pages were retired, most of them duplicates or reports nothing had opened in years. An old bookmark may no longer work. Look for the current equivalent in the list, or see A Report Is Missing or Will Not Open, which explains what each refusal message means. |
|
|
| 28 |
Sending Email & SMS Visit Reminders in OfficeProSending Email & SMS Visit Reminders in OfficeProYou can easily send email reminders to patients who have upcoming visits scheduled for the next day or any day within the next two weeks. Follow these steps to ensure your patients are reminded of their appointments. How to Send Email RemindersFrom the Home screen, click Email Visit Reminders in the Messages and Reminders box. The Visit Reminders window displays a list of upcoming visits that haven’t had reminders sent yet. You can select:
Use the checkboxes to exclude any visits for which you do not want to send reminders. When you're ready, click Send Reminders to email reminders for all the selected visits. Handling Missing Email AddressesAfter sending the reminders, OfficePro will display a list of successfully sent emails, followed by a list of patients who could not receive reminders because no email address was on file. Next to these patients' visits, their phone numbers will be listed, allowing you to follow up with a phone call. Once you've made the calls, click Mark Reminded next to each phone call entry to note that the patient was reminded by phone. The next time you open the Visit Reminders window, visits that have already received a reminder or were marked as reminded by phone will not be checked by default. This prevents duplicate reminders from being sent unless you manually check the visit to include it in the next batch. Quick Access to Next Day RemindersIf you just need to send reminders for the next day, you can do so from the top menu on any page. Look for the bell icon in the messages area near the upper-right corner of the screen.
Click the bell icon to open a small Email Reminders window, which only shows the visits scheduled for the next day. As with the main Visit Reminders window, only unchecked visits will appear, and you can use the checkboxes to exclude specific visits as needed. Click Send Email Reminders to send reminders for the selected visits. Any patients without email addresses on file will appear in a phone list, so you can follow up with a phone call. Customizing Your Email RemindersYou can view or modify the text of your email reminders in the Email Settings tab, located in Admin -> General Settings. For more detailed instructions on customizing your email settings, refer to the Configuration video on Email Settings, or check out the Knowledge Base articles on Email Settings and Using Gmail With OfficePro. |
|
|
| 27 |
Close-of-Day Business Activities in OfficeProClose-of-Day Business Activities in OfficeProOfficePro allows you to complete all your end-of-day tasks with ease, including creating and posting deposits, generating daily reports, and reviewing visits for missing transactions. Follow these steps to make sure everything is in order before closing out your day. Accessing Close-of-Day FunctionsTo begin, click Home from the top menu on any page. The Home view provides quick access to essential financial and scheduling functions. Creating a DepositOfficePro makes it easy to create a deposit from payments received throughout the day:
The Create Deposit window will display a list of all payments received since your last deposit. By default, all transactions will be included, but you can customize your deposit by selecting specific payments, such as separating cash and checks. Once your selections are made, click Create Deposit at the bottom of the list to generate a formatted, printable deposit slip. Each payment you include will no longer appear for future deposits, making it easy to create separate deposits for different payment types. End-of-Day ReportThe End of Day Report gives you a detailed summary of the day’s activities, including visits, payments, claims, and deposits. To view the report, click End of Day Report in the Financials box. At the top of the report, you’ll see a summary of the day’s visits and financial transactions, including:
Below the summary, the report breaks down the day’s details:
Reviewing the Day’s VisitsBefore the day’s transactions lock at midnight, it’s crucial to review visits for missing or incorrect transactions. This allows you to make any necessary corrections before the day’s records are locked. There are two ways to review visits from the Home screen: Visit List: Access a chronological schedule view by clicking Visit List in the Scheduling box. Payments and charges associated with each visit will appear next to the Encounter, Billing, and charting icons.
End of Day Report: For a quick overview of transactions, use the Standard level of detail to view each visit’s charges, allocations, and balances. Visits with zero charges will stand out, making it easy to identify those needing attention. Final Review Before ClosingPerforming a quick review at the end of the day ensures all transactions are correct and complete. This way, you can make any needed corrections before the day’s data is locked and uneditable (except by an Administrator). For additional information on using reports in OfficePro, refer to the Knowledge Base article on Reports. |
|
|
| 5 |
Using the Patient Encounter Form in OfficeProUsing the Patient Encounter Form in OfficeProThe Patient Encounter form allows front-desk users to manage various tasks related to patient visits, including adding services and products to create a patient receipt, applying payments and discounts, managing visit-related documents, scheduling follow-up appointments, and, if applicable, creating an insurance claim. Accessing the Encounter FormYou can access the Encounter form in several ways:
Overview of the Encounter WindowThe Encounter window displays the following:
Adding Services to the Encounter
Adding Products to the Encounter
Creating an Encounter ReceiptYou can save the encounter at any time, creating a permanent PDF document of the visit, by clicking Create Encounter Receipt from any tab in the Encounter form. Additional ResourcesFor more information about managing products and services, please refer to the Knowledge Base articles on Product Administration and Service Administration. |
|
|
| 22 |
Tracking Patient Cancellations and No-Shows in OfficeProTracking Patient Cancellations and No-Shows in OfficeProTo effectively manage and track patients who have canceled or missed their appointments, you can utilize the following methods: 1. Setting Patient AlertsYou can set alerts for patients who cancel or do not show up for their appointments:
2. Color-Coding Canceled AppointmentsYou can visually distinguish canceled appointments and no-shows on the schedule and reports:
3. Combining Both ApproachesFor comprehensive tracking, consider combining the alert system and color-coding:
|
|
|
| 24 |
Patient AdministrationPatient AdministrationPatient Administration OverviewThe Patient Administration section enables you to manage your patient list, add and edit patient details, and apply filters to access frequently used subsets of the patient database. Accessing the Patient ListTo access your patient list, navigate to Connect in the top menu of any page and select Patients. Alternatively, you can search for a specific patient using the search box located in the upper right-hand corner of any page. Main Patient List ViewThe main patient list displays all patients in alphabetical order. For each patient, the list includes:
Active patients appear at the top of the list, while inactive patients are displayed at the bottom. You can sort the list by either first or last name or filter the list by the first letter of the patient's name. To view patient prospects, click Show Prospects. You can add visits and encounters directly from this list by hovering over the patient's name. More details on adding visits and encounters will be provided in a later video. On the left-hand side, additional filters are available to view specific patient lists, such as:
Adding a New PatientTo add a new patient, click the + icon at the top of the list or select Add A Patient from the left-hand menu.
Editing a PatientTo edit a patient’s information, click the pencil icon at the end of the patient’s row. The Edit Patient window includes all the same fields as the Add Patient window, along with additional options for managing billing cases in the Insurance tab. Billing cases will be covered in a separate video. Patient Detail SheetClicking on a patient’s name from the main patient list opens the Patient Detail Sheet, where you can access the patient’s complete information and perform various patient-related actions. At the top of the window, you’ll see:
The contact information is displayed below this, along with tabs that allow access to:
If the patient has an outstanding balance, an Accounts Receivable (AR) History tab will also appear. Unscheduled notes and patient alerts are located below these sections. Additional ActionsThe left-hand menu in the Patient Detail Sheet provides links to additional patient-related tasks, including:
Other features on the left-hand menu include a list of the patient’s current problems and medications, the ability to create family groups for more convenient payment processing, and options to print address or chart labels using a connected Label Writer. For practices processing credit card transactions through BluePay, you can store patient credit cards and process payments directly from this page. |
|
|
| 33 |
Managing Documents in the Encounter Documents TabManaging Documents in the Encounter Documents TabThe Encounter Documents tab is designed to help you view and manage all documents related to a patient visit, including the ability to create and upload various documents. Follow these steps to utilize this feature effectively: Accessing the Encounter Documents Tab
Viewing Documents
Creating Additional DocumentsYou can create several visit-related documents directly from this tab:
Uploading Additional DocumentsUpload Documents: You can upload documents related to the visit, such as signed releases or copies of the patient’s ID. Upload Process:
Uploaded documents can be accessed through the Encounter window or the patient detail page. Any notes added will be visible in both locations. Managing Uploaded Documents
Sending Documents via Email
Managing Document Types
|
|
|
| 34 |
Encounter Follow Up StepsEncounter Follow Up StepsAfter a patient visit, the Follow-up tab in the Encounter form allows you to take important actions to ensure continuity of care, such as scheduling a return visit, sending internal messages, or setting future reminders for yourself or other team members. Here's how you can manage follow-ups effectively: Sending Internal MessagesTo communicate with another user in your practice:
Once sent, the message will show up in the selected user’s notifications, helping streamline internal communication, especially in fast-paced environments where follow-ups are critical, like holistic clinics or integrative health centers. Setting Task RemindersReminders can be set for any future date, ensuring nothing slips through the cracks:
The reminder will only appear in the recipient’s notifications when the due date arrives, making this feature particularly useful for multi-provider practices where different roles collaborate on patient care. Scheduling a Follow-up VisitTo book a follow-up appointment:
For more information on scheduling follow-ups, the Knowledge Base article on Adding a Visit will guide you further. By using these follow-up features, you can keep patient care on track, ensuring timely communication and smooth scheduling, which are crucial in holistic or integrative health settings. |
|
|
| 52 |
Using the SMS Messaging Features in OfficeProUsing the SMS Messaging Features in OfficeProOfficePro offers integrated SMS communication so you can efficiently stay in touch with your patients directly through the platform. This guide explains how to access and use the SMS features to manage conversations and respond to patient messages with ease. ? Accessing the SMS Conversations WindowYou can open the SMS Conversations window in one of two ways: From the Footer: Click on the Comments icon located in the footer of the OfficePro service. From the Tools Menu: Click on the Tools Menu in the top navigation. Select SMS Admin. Both options will bring you to the central SMS Conversations interface. ? Managing ConversationsOnce you're in the SMS Conversations window: You’ll see a list of all ongoing conversations sorted by most recent activity. Each conversation represents a phone number, and OfficePro will show each patient record associated with that number. This is especially useful when family members or shared lines are used — all linked patient records will be clearly visible. ?️ Communicating with PatientsTo continue or start a conversation: Click on any conversation in the list to open the message thread. You can view the full message history and send replies directly from the window. All sent and received messages are securely logged and time-stamped for your records. ✅ Helpful TipsMessages are stored per phone number — always verify the correct patient from the list when messaging a shared number. You can use SMS to confirm appointments, send reminders, or follow up with patients — just like email, but faster and more direct. |
|
|
| 97 |
Sharing Your Scheduling Links and ButtonsSharing Your Scheduling Links and ButtonsOnce online scheduling is on, patients reach it through a link you publish. Embed Links and Buttons generates those for you - the point being that you can send a patient somewhere more specific than your front page. Three kinds of link
All Visit Types offers everything you have switched on. Getting the link outCopy link gives you the address for an email, a text or a social post. Copy the button code gives you HTML for a proper Schedule an appointment button on your website - hand that to whoever maintains it. Test the Button before you publish. It takes seconds and it is the difference between a link that works and one your patients quietly give up on. Build your own link is there when you want a combination the standard ones do not cover. Embedding the portalRather than sending patients away, Embed the Portal puts it inside a page on your own site using the Portal Include Code. It keeps patients on your domain, which is worth something. Check it on a phone as well as a desktop - an embed sized for a wide screen is where this usually goes wrong. Where to put them
Keeping them workingLinks point at visit types and providers. If you stop offering a type online, or a practitioner leaves, the links pointing at them stop being useful - and nothing tells you where you published them. Keep a short list of where each link went; it takes a minute now and saves an afternoon later. Re-test your main link whenever your website is rebuilt. |
 |
|
| 48 |
Using Telehealth in OfficeProUsing Telehealth in OfficeProOfficePro has integrated telehealth conferencing, so virtual consultations are set up from inside the platform rather than through a separate meeting tool. The link is created with the visit and sent to the patient. Setting Up a Telehealth Visit: Create a New Visit:
Choose a Telehealth Visit Type:
Automatic Patient Notifications:
Additional Tips:
|
|
|
| 89 |
Receiving and Posting ERAsReceiving and Posting ERAsAn ERA is the payer's explanation of a payment: which claims it covers, what was allowed, what was adjusted and what is left. Posting it applies all of that to the right claims at once, which is the whole point of billing electronically. Bringing them inFrom the BillPro Billing Center, Check ERAs fetches whatever the clearinghouse is holding. The count beside it tells you how many are waiting, so an unchanging number means nothing new has arrived - not that something is broken. Do this on a regular day of the week. ERAs sit until you fetch them, and a fortnight of unposted remittances makes every patient balance you look at wrong. Reading the listNew arrivals appear under ERAs Received, each showing:
Reconcile the Amount against the actual deposit before you post. A remittance total that does not match the money received is the one thing worth stopping for - it usually means a second ERA belongs to the same cheque. PostingProcess applies one remittance: payments and adjustments land on the claims it names, and the claim balances move accordingly. Once posted it moves to PROCESSED ERAs with a Processed On date. Process ERAs does the same for the batch, which is what you will normally use. ReProcess runs a remittance that has already been processed again. Reach for it when a posting went wrong, not as a matter of routine. Checking the resultOpen a claim from the remittance and look at Claim Detail:
Claim Balance is the number that matters. It is calculated from the claim's services and payments, and it is what the aged views work from. What is left after the insurer paysA balance remaining after an ERA is posted is usually the patient's - a deductible, co-insurance, or a non-covered service. It is not automatically a problem with the claim. If the balance belongs to a secondary insurer instead, use Create SECONDARY Claim Document on the claim. That produces a Secondary Claim Document carrying the primary's payment and adjustments, which is what a secondary payer needs to see. Payments that did not come as an ERAPaper cheques, and payers whose ERA enrolment has not completed, are posted with Process Payer Payment from the billing centre. The result is the same; you are keying what the ERA would have told us. |
 |
|
| 35 |
Encounter Billing Tab OverviewEncounter Billing Tab OverviewHere's a concise summary of the Encounter Billing tab process for creating an insurance claim using the OfficePro Suite: Accessing the Billing Tab:
Billing Case Details:
Creating a Claim:
Viewing the Claim:
Additional Resources:
|
|
|
| 44 |
How to Edit and Resubmit an Insurance ClaimHow to Edit and Resubmit an Insurance ClaimEditing and resubmitting an insurance claim is a straightforward process in OfficePro. Follow these steps to ensure your claim is accurate and submitted successfully. Step 1: Locate the ClaimYou can find the claim in OfficePro using one of the following methods: By Patient:
By Visit:
Using BillPro:
Step 2: Open the Claim Details
Step 3: Edit Claim InformationClick on either the ID or CPT field to open the Edit Service window. Navigate to the Billing Details tab. Make Necessary Edits:
After making your changes, click Save Encounter Service. Step 4: Re-create and Resubmit the Claim
ConclusionBy following these steps, you can efficiently edit and resubmit an insurance claim in OfficePro, ensuring that your claims are accurate and compliant with the requirements of the insurance companies. If you have any questions or encounter any issues during this process, feel free to reach out for further assistance! |
|
|
| 6 |
Creating a Treatment PlanCreating a Treatment PlanA treatment plan is the document the patient takes away - what to do, what to take, and how. It is built from the encounter, and it prints as a clean patient-facing page rather than as a copy of your clinical note. Open the planOpen the plan from the encounter you are working in. It opens showing the document as the patient will receive it, with the patient's name, the date, you as provider, and a DRAFT watermark across it until it is finished. The list on the left, headed T:// TXPLAN, shows the sections the plan is made of. Which sections exist is set up once for the practice - see Configuring your ChartPro Service. 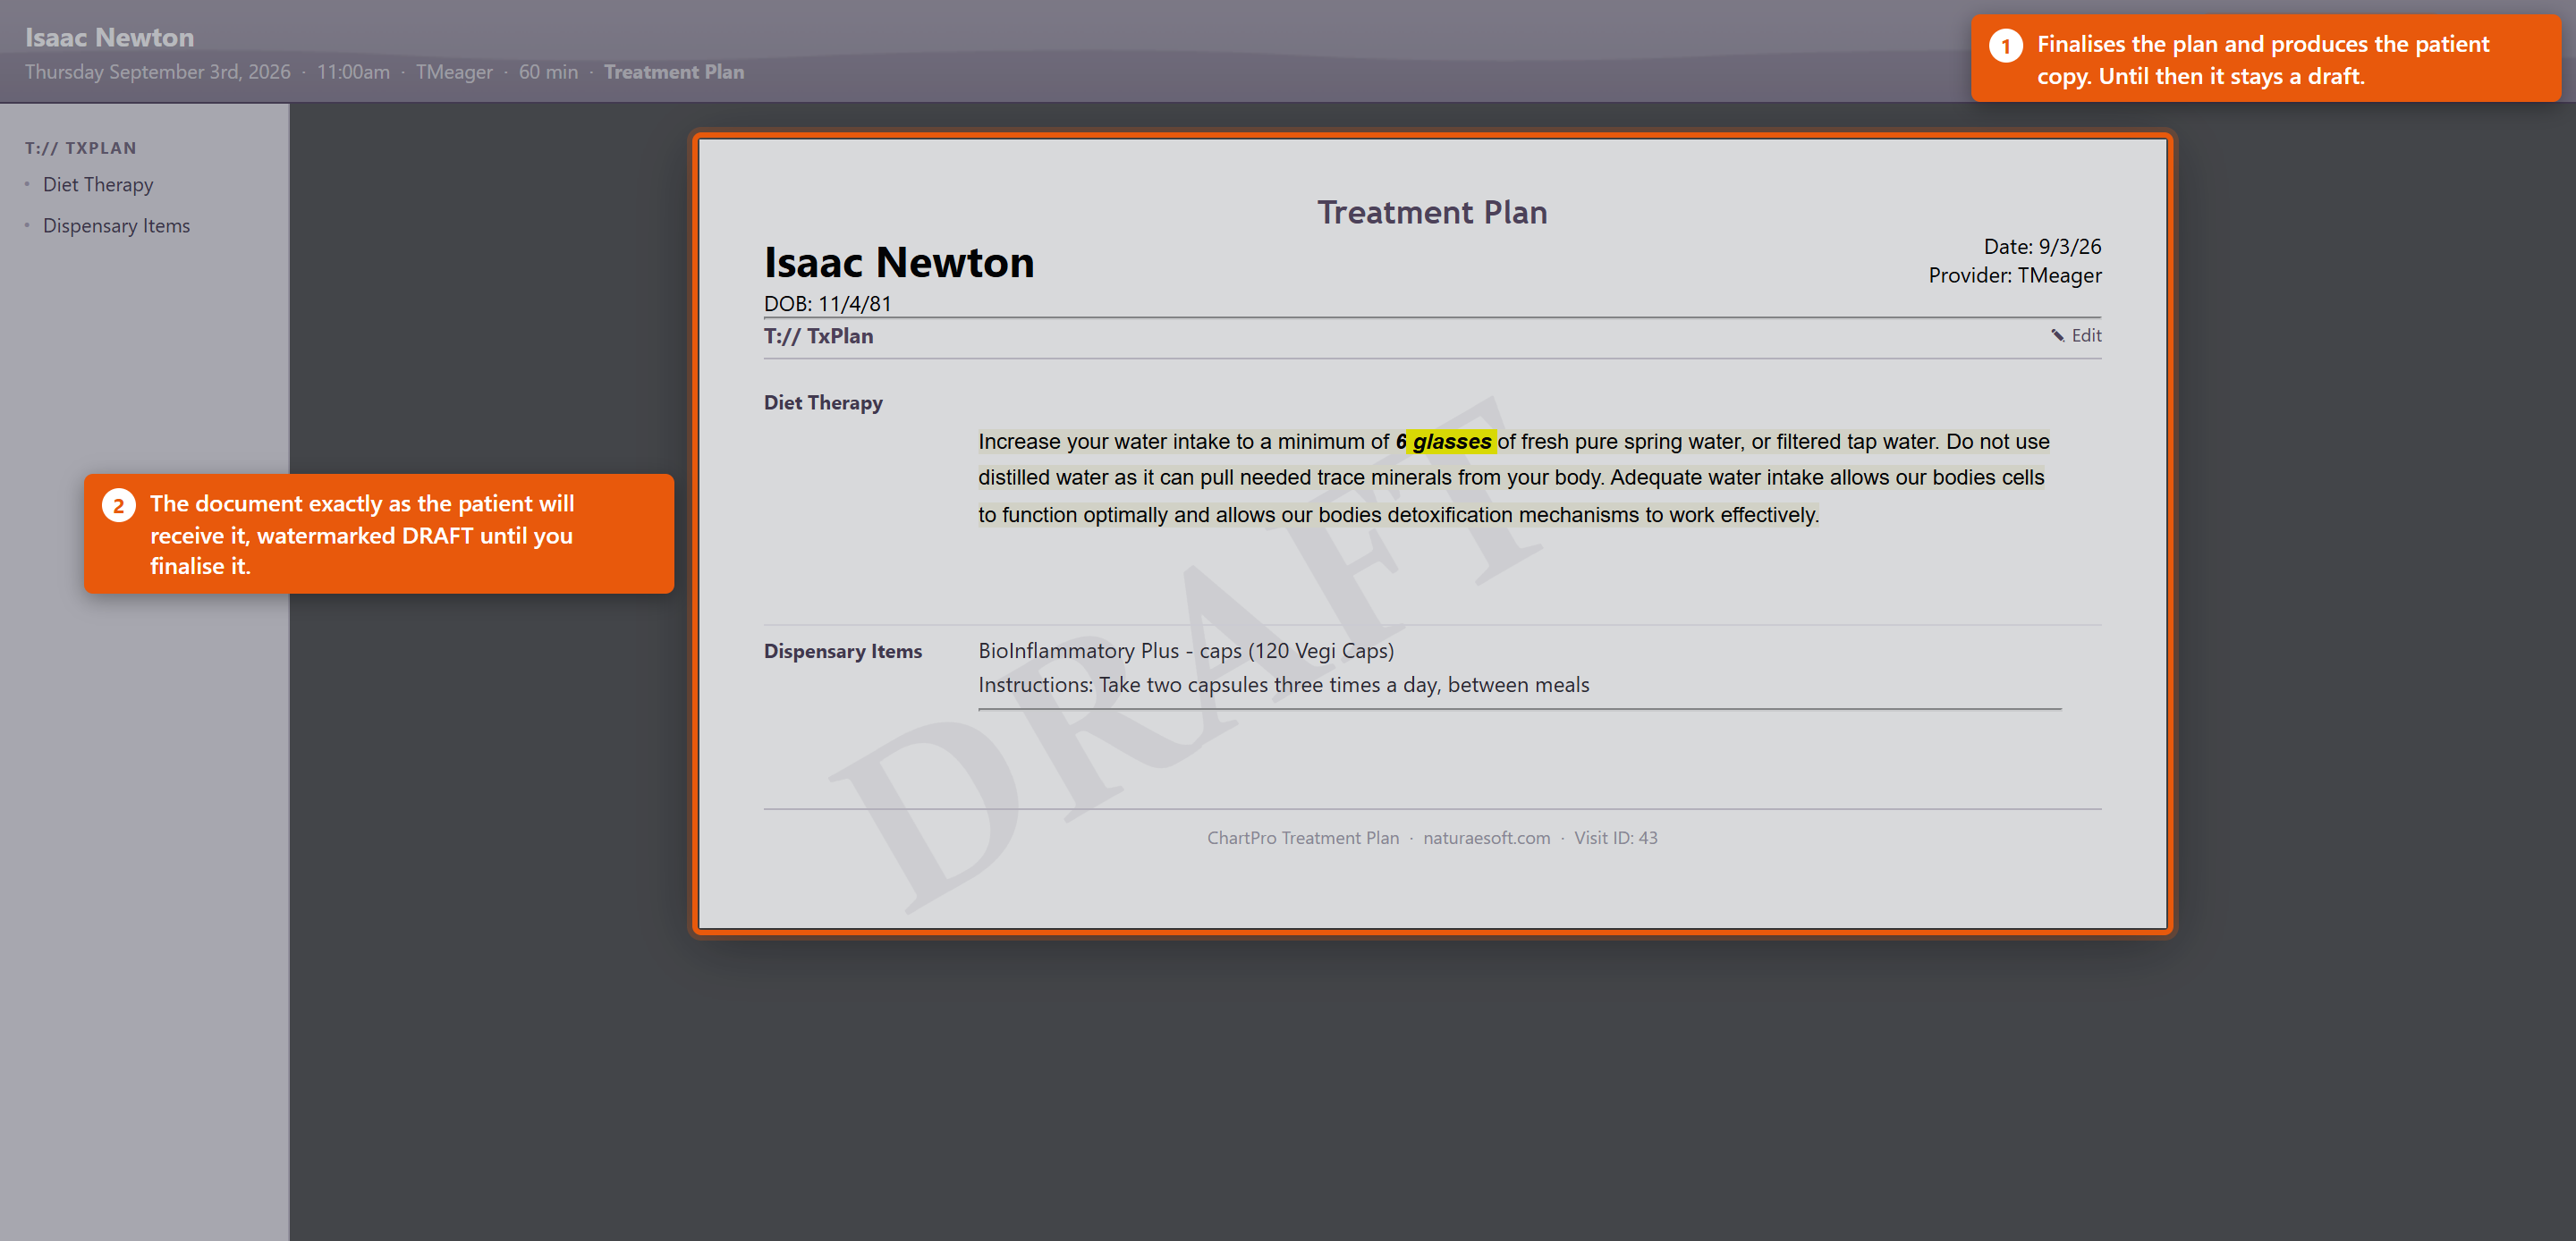 Fill it inEach section has an Edit pencil beside it. Click it, write the content, and it appears in the document straight away, so you are always looking at what the patient will see. Two kinds of section behave differently:
Finish itSave & Document finalises the plan and produces the patient copy. Close leaves it as a draft to come back to. A plan left in draft is not lost, but the patient has nothing - so finish it before the patient leaves rather than intending to come back to it. Making it useful
Dispensary items on the plan are the same products as in your catalogue, so the instructions can come from the product record rather than being typed each time. See Adding and Editing Products. |
 |
|
| 101 |
Dictating a Note with Auto ChartDictating a Note with Auto ChartAuto Chart records a consultation, transcribes it and drafts the chart note. You read the draft and decide whether it goes in. Before you startOpen the note on the right visit - the AI is given that visit's Patient, Provider, Visit Type and Date of Service, and it uses them. Starting from the wrong visit produces a plausible note about the wrong context. Tell the patient what you are doing, in whatever words your practice has agreed. RecordingAuto Chart opens the listener and starts recording; you will hear a tone. The panel shows your use for the month against 40. Things that make the difference between a good draft and a poor one:
Reading the draftWhen it finishes you get AI Note Preview - Review the AI-generated chart note below. Read it properly. Check the numbers against what you remember, check nothing has been attributed to the patient that they did not say, and check nothing has been invented that sounds reasonable. A draft that reads well is not the same as a draft that is right, and once you accept it, it is your note.
Edit the note afterwards exactly as you would any other. The draft is a starting point, not a finished document. Rating a noteRate This Note asks about Transcription Accuracy, AI Note Quality and an Overall score from Poor to Excellent, with Comments, then Submit Rating. It genuinely is read - Your rating helps us improve ChartPro AI. Rate the ones that came out badly and say what was wrong in the comments. Almost nobody rates anything, so a specific complaint carries real weight. Looking back at what it wroteThe review link beside the button opens ChartPro AI - Encounter Review, listing your encounters by Date and Encounter # with their Note Quality, or Not rated. Opening one shows the Transcript next to the ChartPro AI Note. If you ever want to know whether it misheard something or invented it, this is where you find out. |
|
|
| 2 |
Creating your first Chart NoteCreating your first Chart NoteWelcome to ChartPro where you can easily and competently document your encounters with patients with ease. To get started, click on the [C] button in the visit icons area on any visit. The [C] button allows you to access the chart note for a particular visit. To learn more about visit icons and visit workflow click here.
Establish a Patient Visit:
Access the Chart Note:
Navigate to the ChartPro EMR Interface:
The ChartPro interface will load for this visit in a popup window and will put you right into the primary segment of the chart (usually, Subjective > HPI). The charting interface is organized in a compact but robust way to help you document your visits easily, accurately, rapidly, and effectively. To make the most of your charting experience familiarize yourself with the charting environment. Let's start with a description of the interface: Adding Content:
Incorporate Preformatted Content:
Complete Other Segments:
Save Your Note:
Additional Tips:
This guide should help you get started with creating chart notes effectively in OfficePro. |
|
|
| 93 |
Ordering Labs and Reading ResultsOrdering Labs and Reading ResultsLab orders are placed in LabCorp Link; results come back into OfficePro and land on the patient's chart. This covers both ends, and the join between them. Placing an orderOrders are placed in LabCorp Link, not in OfficePro. You build the order in the lab's own software, using its test menu, its priorities and its requisition. What OfficePro provides is the demographic bridge, so nothing is retyped. In LabCorp Link's patient search, look the patient up by their MRN or patient ID from OfficePro. That pulls their demographics and your insurance company list straight across. Two things follow from that, and both matter:
The bridge is read-only and authenticates by the IP address you connect from, so it works from the clinic and not from elsewhere. If the patient lookup returns nothing, see the troubleshooting article before re-keying the patient by hand. Finding resultsTwo places, for two different jobs:
The accession number is the lab's own reference. It is what to quote when you ring them. Reading a reportEach result line shows the test, the result, its units, the reference range, a flag, where it was performed and its status. Where a patient has had the same test before, the test name is a link to its history - the fastest way to see whether a value is drifting or has always been where it is. What the flags mean, exactlyAny flagged result is shown in bold. Only some are marked Critical Result, with a highlight and a warning icon:
This distinction matters clinically. Plain H and L are the overwhelming majority of flagged results - across all practices they outnumber critical flags by more than two hundred to one. A result being un-highlighted means the lab did not call it critical, not that it is normal. Read the flag column, not the colour. A report the lab has marked as carrying a critical value shows an ALERT badge in the reports list. Those are worth working first. Results that arrive without an orderResults come back for labs you did not order through OfficePro too - a hospital, a specialist, a lab the patient went to directly. They appear the same way, and they still need attaching to the right patient if the lab's details did not match yours. |
 |
|
| 82 |
Checking Patients In and Out at the KioskChecking Patients In and Out at the KioskThe kiosk shows Kiosk Check-In and asks the patient which they are doing: Arriving for an appointment or Leaving after your visit. Staff mostly need to know what it asks for, so they can help when somebody gets stuck. Checking inThe patient identifies themselves with First Name, Last Name and Date of Birth. All three must match the record, and the kiosk says which one did not - Last name does not match. or DOB does not match. That is usually a genuine mismatch in your data rather than the patient being wrong: a married name never updated, or a date of birth entered as a typo years ago. Fix the record rather than working around it, or the same patient fails every visit. Where you take patient photos, the kiosk offers Capture, and Continue Without Photo for anyone who would rather not. Take the second option seriously - a patient who feels pressured into being photographed at a screen in a waiting room remembers it. Insurance can be added or confirmed during check-in. Insurance on file shows what you already hold; Add Insurance takes a new Insurance Company. If they already have cover on file, the kiosk asks what to do with it:
Getting this wrong causes claim problems weeks later, so it is worth a member of staff glancing at anything that changed. The kiosk finishes with Check-In Complete, and the patient appears on your check-in list. Checking outLeaving after your visit settles anything owed and offers the patient their paperwork. Where nothing is due it says No balance due. or No payment is due at this time. and moves on. The patient can ask for Email me a receipt, Email my encounter document or Email my treatment plan - which saves reception printing anything - and there is an Add a tip (optional) step where the practice uses it. Finish Check-Out completes it, and the kiosk shows Check-Out Complete. The quiet statesNo check-ins pending right now and No patients ready to check out mean exactly that - the kiosk is working and has nothing to do. They are not errors. Helping a patient who is stuck
|
 |
|
| 53 |
Patient Product OrdersPatient Product OrdersPatients can order products themselves from the PatientPro portal, and those orders arrive in OfficePro for your staff to fill. This covers both halves - what the patient does, and what you do with the order once it lands. What the patient seesYour products in the portal lists what has been prescribed or recommended for them, and Products Available Over the Counter lists anything you sell openly. They can search, filter by category, and reorder anything they have had before. Checkout is a short sequence under Online Check Out:
They then see Your Order Was Received, and the order appears under Order History with Order Details and Products in this Order: for each one. The charge is not settled at that point. The patient has authorised it; the money is taken when your staff process the order. This matters, because a patient who cancels before you process has not been charged. Working orders in OfficeProOrders arrive in Active Patient Orders. Opening one shows Steps to complete this order - the sequence for that order, which differs depending on whether it is being collected or delivered. 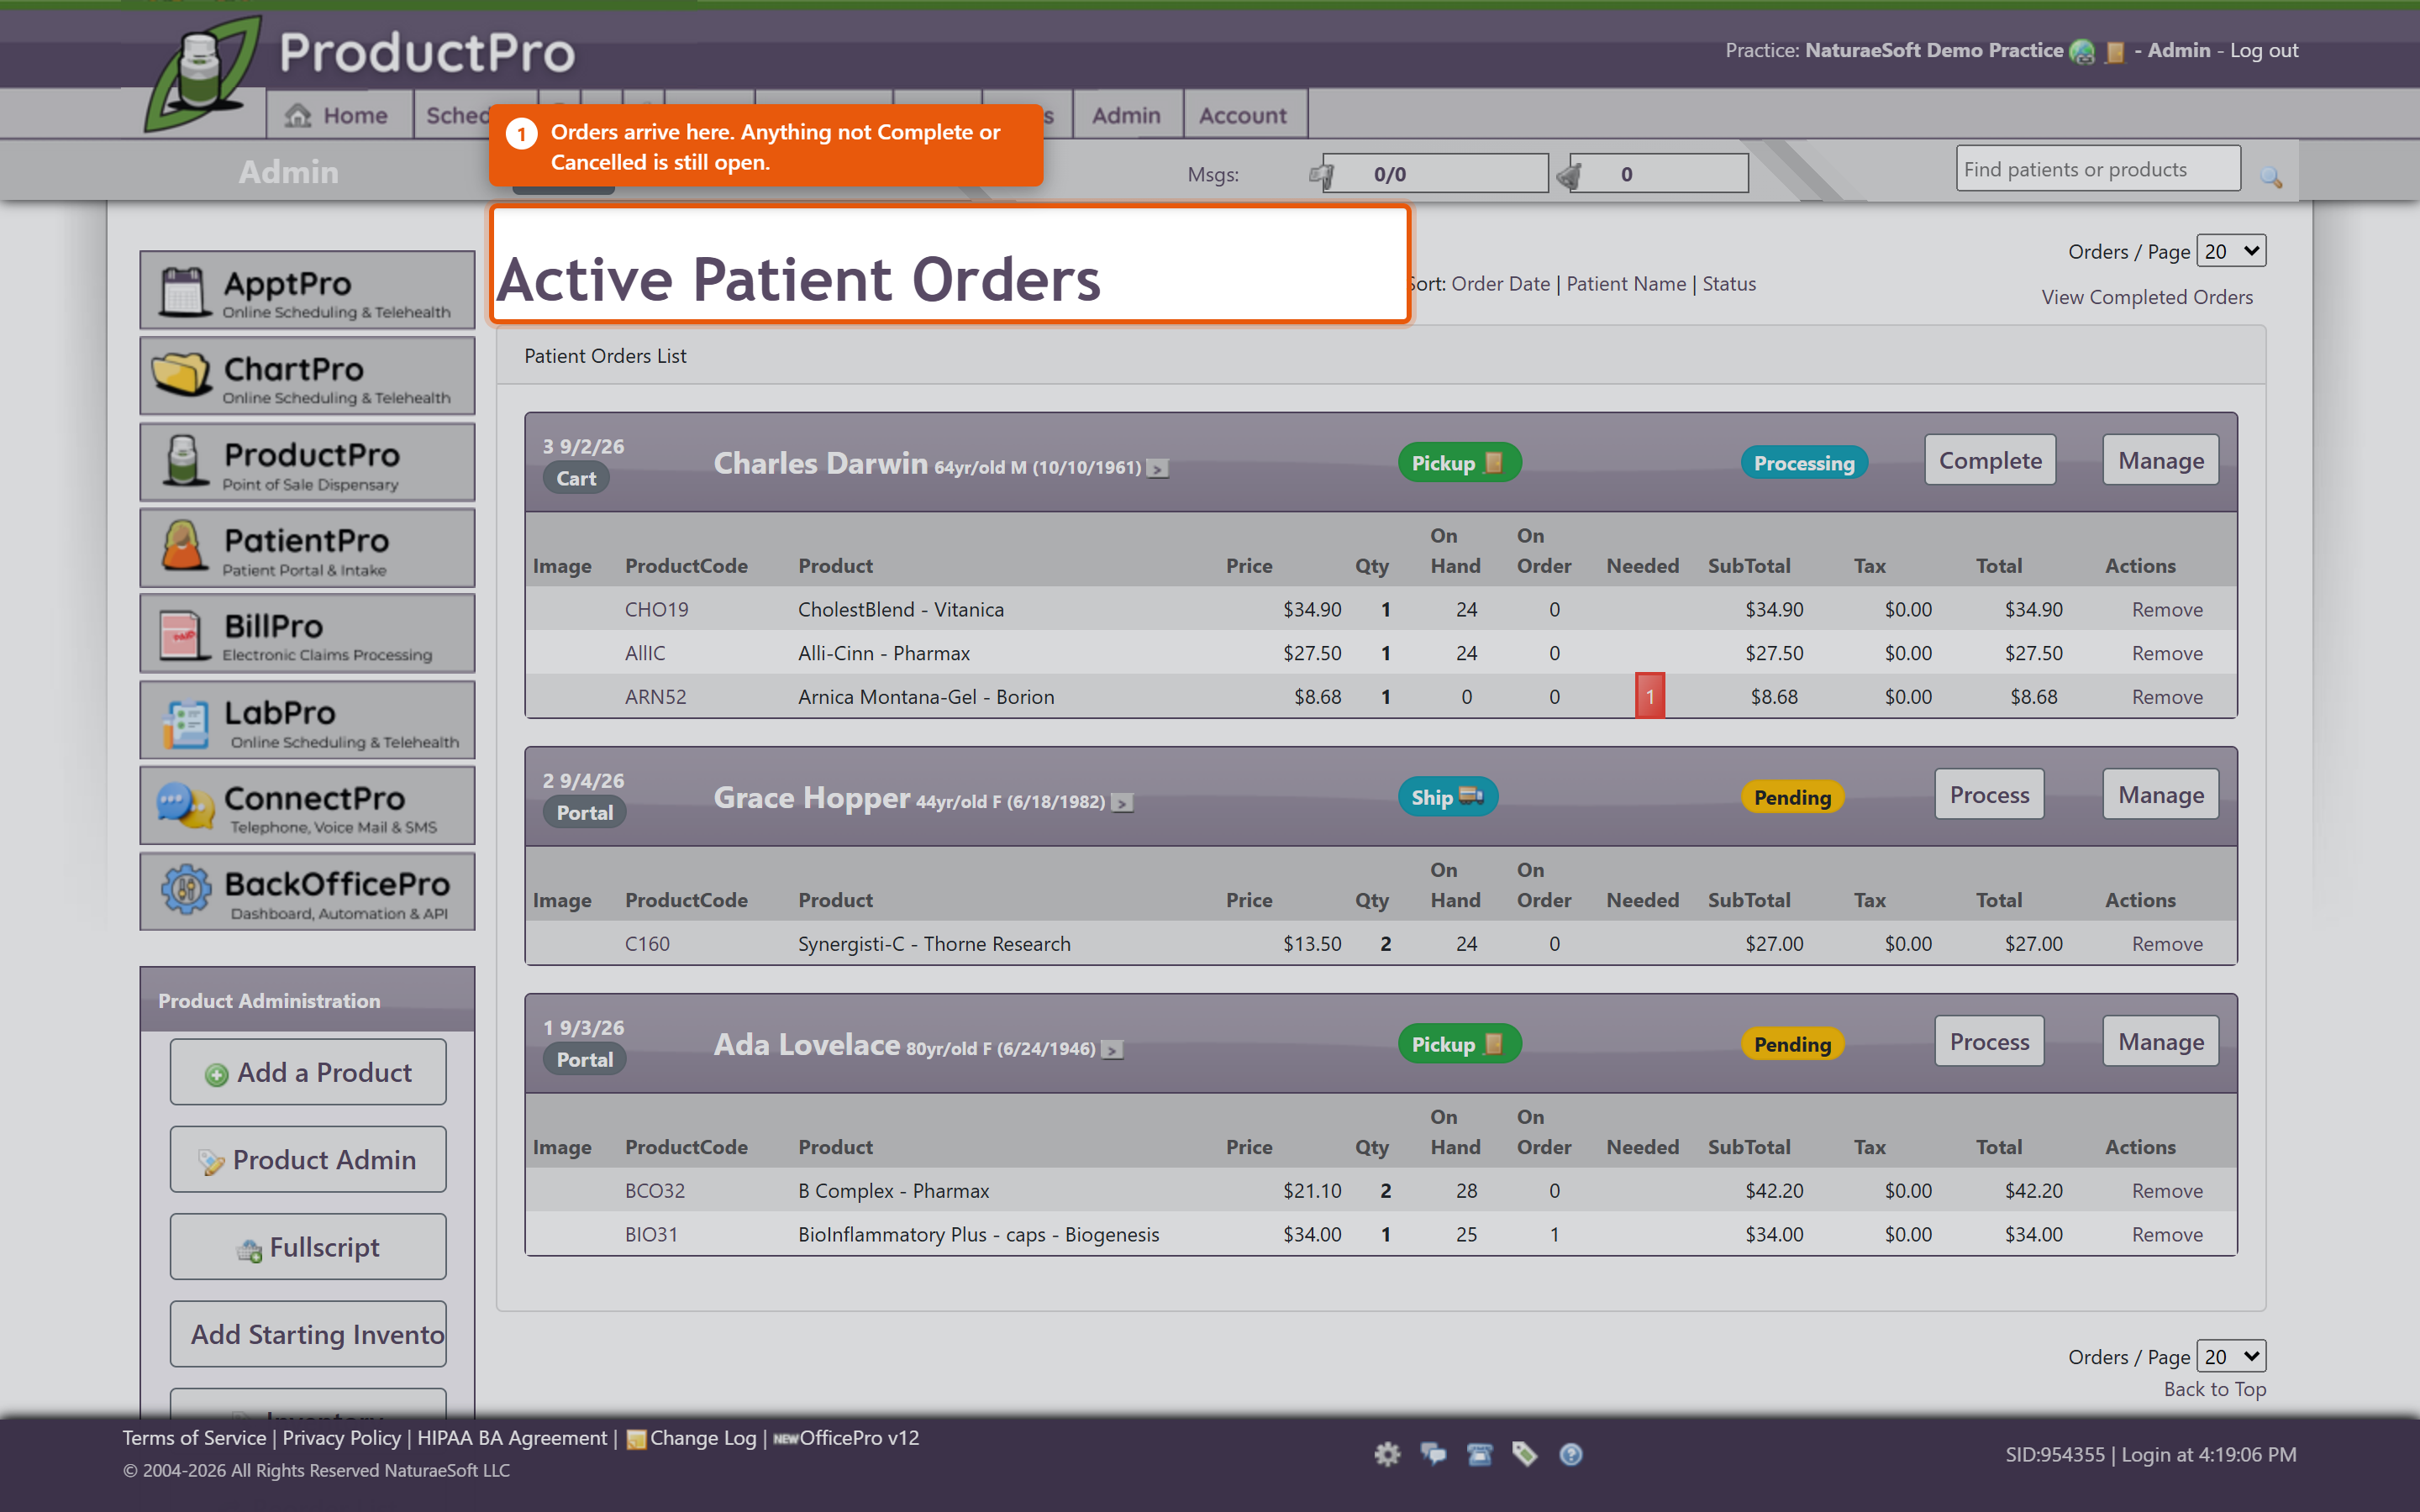 Each product line shows Needed against OnHand, so you can see immediately whether you can fill it. Where you cannot, Order Products puts what is short onto a purchase order. You do not have to fill an order all at once. Work the lines you can and leave the rest - the order stays open with the remainder outstanding, which is the right answer when one item is on back-order and the patient wants the rest now. 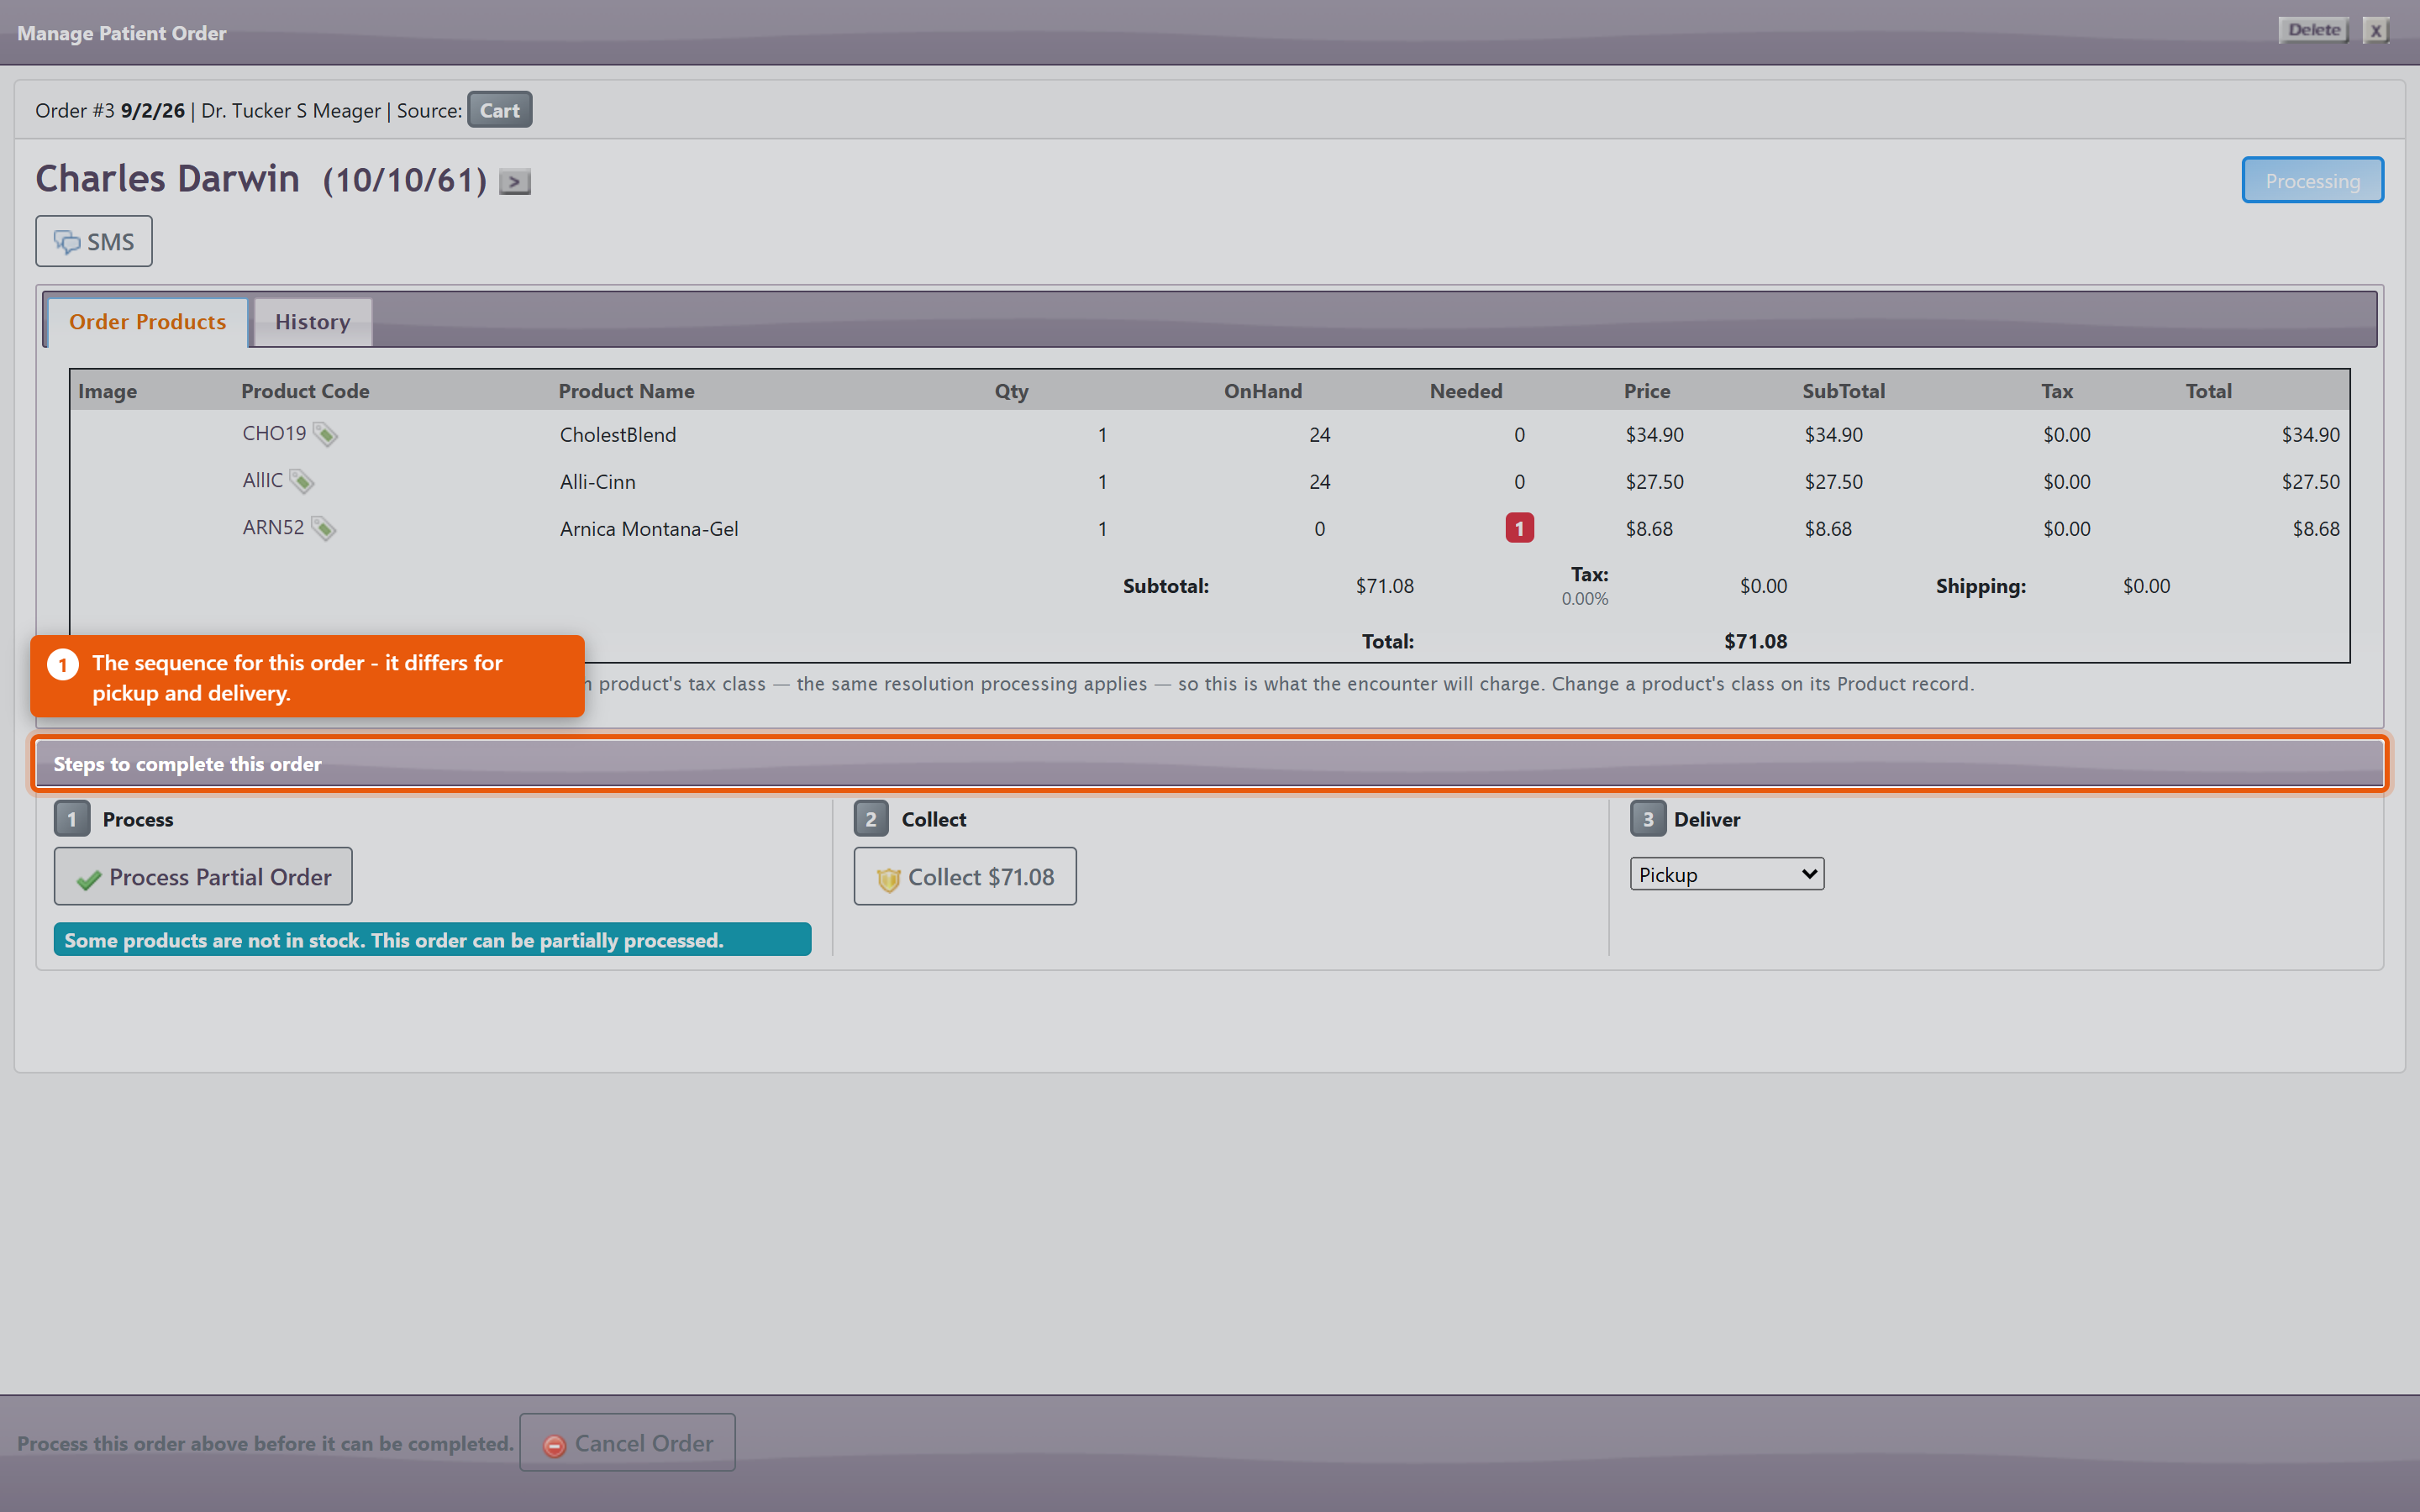 The actions you will use most:
Scheduled for completion by shows when the order is expected to be finished, which is what the patient has been told. Carts that never became ordersPatient Carts shows baskets patients filled and did not check out. These are worth a look - a cart abandoned at the payment step often means a card problem rather than a change of mind, and a phone call recovers the sale. What ordering does to the rest of the system
Keeping it working
|
 |
|
| 75 |
Importing from the Fullscript CatalogImporting from the Fullscript CatalogOnce Fullscript is connected you can browse their catalogue from inside OfficePro and add products to your own. There are two things you will do here, and they are different: adding products you do not stock yet, and linking products you already have to their Fullscript equivalent. The screen has two tabs matching those two jobs: Browse & Import and Link Existing Products. Finding a productOpen Fullscript Catalog and use Search. Results show the Brand, Size, SKU and Price, and can be narrowed by Network. The catalogue hides what you already stock. The Show: filter starts on products I don't stock, which is sensible when you are looking for something new and misleading when you are not - search for a product you already carry and nothing comes back. Switch it to everything, including mine before concluding a product is unavailable, and remember the catalogue runs to more than one page. The NETWORK RANK column ranks products by how often they are recommended across the NaturaeSoft network. It is not your own prescribing history - Fullscript does not report per-practice popularity - so read it as a general signal rather than as a reflection of your patients. 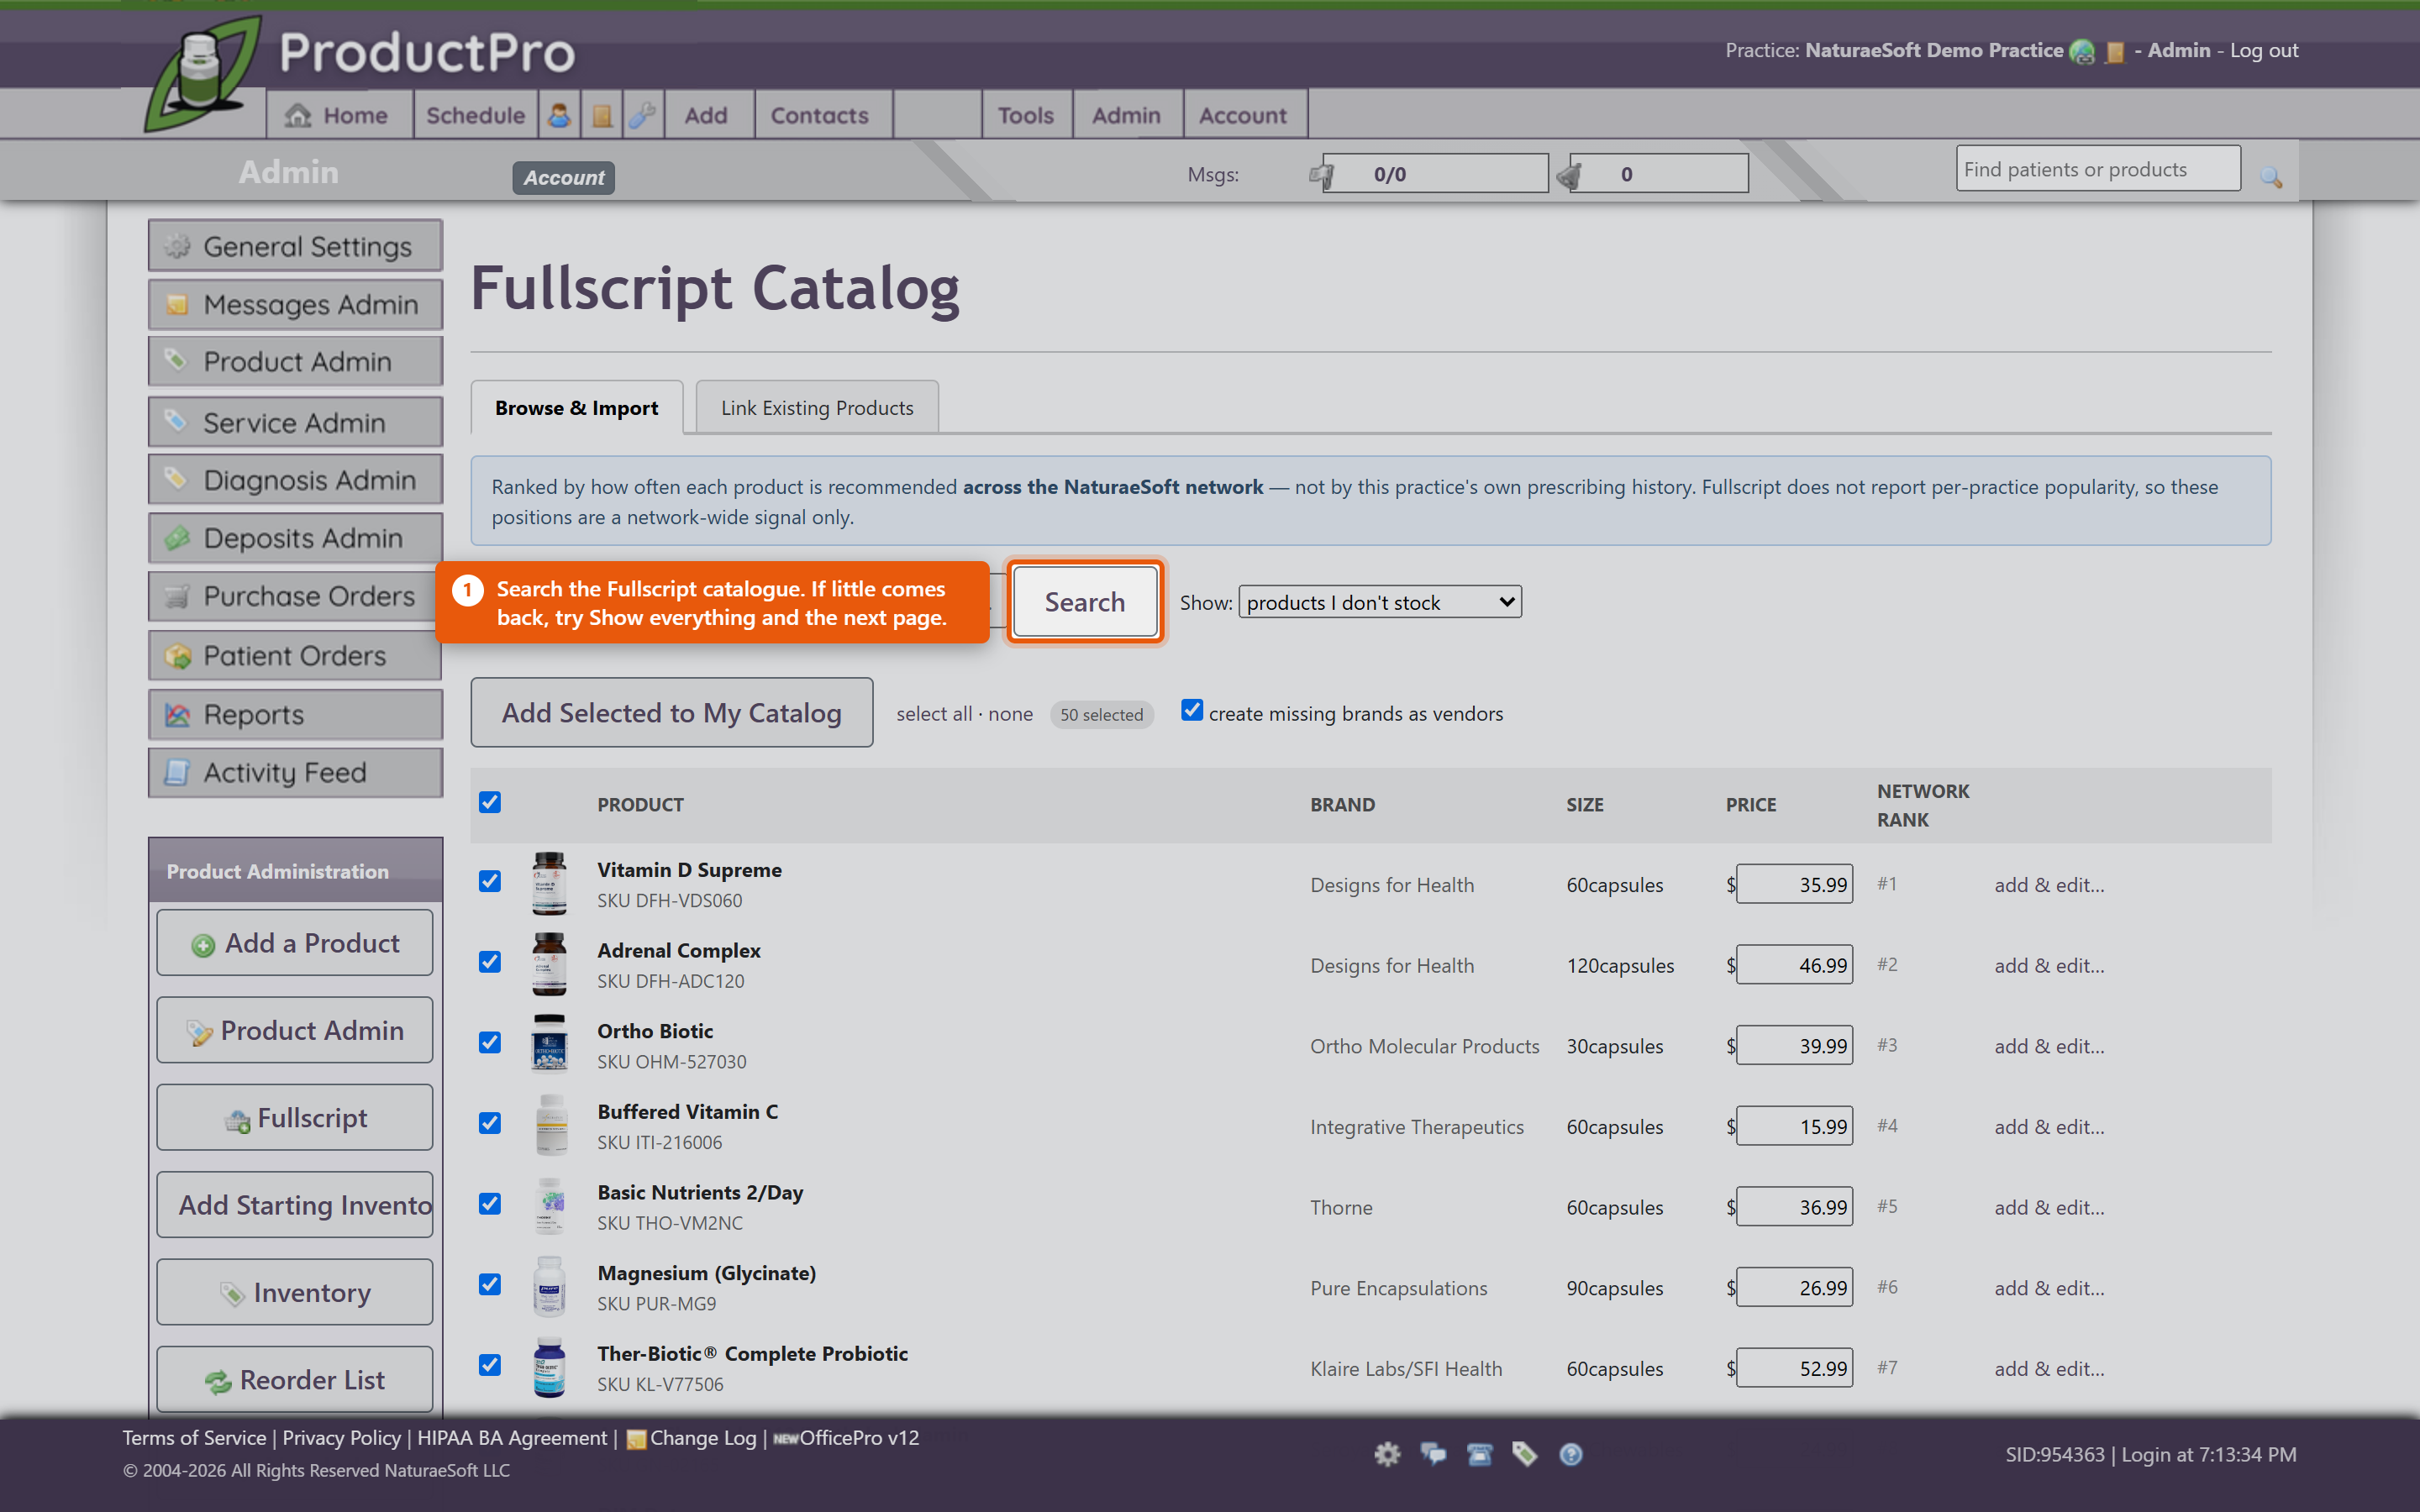 Adding new productsTick the products you want and click Add Selected to My Catalog. They arrive as ordinary OfficePro products carrying their name, brand, size and price, using the defaults set in ProductPro settings. Leave create missing brands as vendors ticked. It records each product's brand as a vendor as it imports, which is what makes Filter By Vendor useful afterwards and what lets those products go on a purchase order at all. Untick it and you get a catalogue of products with no supplier against any of them. Set Default Dosing attaches standard dosing instructions so they do not have to be typed on every plan. Worth doing for anything you dispense regularly - the instructions are what the patient actually follows. Importing the same product twice is safe. Each Fullscript variant is recorded against the product, and a second import of the same one updates rather than duplicating it. If a product code cannot be derived cleanly the row is refused rather than creating a clashing one. Linking products you already sellMost practices already stock some of what Fullscript carries. Link Existing Products matches your catalogue to theirs so the two are treated as the same product rather than two competing entries. The list pairs Your product and Your code against a proposed Fullscript match. Check the suggestions before accepting them - a match is proposed on name and brand, and two products with similar names can differ in strength or size, which matters clinically. When you are satisfied, use Link Confirmed Matches. Do this before importing in bulk. Linking first means you end up with one entry per product; importing first usually means finding and merging duplicates afterwards. What to watch
Writing a planWith products in place, a provider can create a Fullscript plan for a patient from the chart - see Fullscript Treatment Plans and Create Fullscript Plan. The plan is written under that provider's Fullscript account, which is why each provider has to be linked individually. |
|
|
| 85 |
Managing a Patient's Auto-Order PlanManaging a Patient's Auto-Order PlanAn auto-order plan lives on the patient, against a single product. Each plan has its own interval, quantity and delivery method, so one patient can have a monthly refill of one product and a quarterly refill of another. Setting one upOpen the product on the patient and use the AutoOrder section:
Both Interval: and Qty: have to be set for anything to happen. A plan with an interval and a quantity of zero looks configured on screen and will never generate an order. Put the dosing on the planThis is the step most easily missed. Refill lines take their directions from the plan, not from the product and not from the last dispense. If the plan has no dosing, the refill goes out with no directions on it - a bottle with a label and no instructions. Set the dosing at the same time you set the interval, and check it again if a provider changes the dose later. Changing the dose on a new dispense does not change what the plan sends next month. Seeing every plan at onceThe Auto Orders button on the ProductPro admin page opens Patient Auto Orders, which has two views:
Each row shows the Product Code and Product Name, the Interval (Days), Quantity and Method, the Start and Next dates, and - usefully - On Hand and On Order. Those last two are the early warning: a plan due next week for a product you have none of is a problem you can still fix this week. Delivery shows as a PICKUP, SHIP or PREMIUM badge. No orders found means nothing is due in that view, not that the feature is off. Changing a plan
When patients set their own upPatients ordering through the portal choose between three options, and it helps to know which one they picked:
They also choose Refill every and Delivery. Their plans appear in Patient Auto Orders alongside the ones you created, and you can edit them the same way. Watching the whole bookThe Subscription Health report under Products shows active auto-orders, estimated monthly recurring revenue, and which plans are about to lapse. Lapsing plans are worth a call - a patient whose subscription quietly ended usually did not decide to stop. |
|
|
| 38 |
Accepting Product ReturnsAccepting Product ReturnsProblemA patient presents a product for return. BackgroundThe approach to recording a product return in OfficePro varies based on the circumstances of the return:
The primary difference between these scenarios is the status of the returned product regarding inventory and how the return impacts current transactions. SolutionsScenario A: Return for Refund or Credit
Scenario B: Return with Current Visit
Scenario C: Non-acceptable Return
Important Alerts
|
|
|
| 40 |
Product Inventory Basics in OfficeProProduct Inventory Basics in OfficeProOverviewOfficePro serves as a point-of-sale system, streamlining the process of adding and managing your inventory. The system automatically adjusts stock levels based on sales and received inventory, minimizing the need for manual inventory adjustments. Adding Starting Inventory
Managing InventoryPeriodic Physical Inventory Counts:
Reorder List:
ConclusionNow that you have an understanding of how to set up and manage your product inventory in OfficePro, you can easily track your stock levels, sell products, and ensure timely reordering. This streamlined process helps maintain an efficient inventory system, supporting your practice's overall operations. If you have any questions about specific features or processes, feel free to ask! |
|
|
| 41 |
Purchase OrdersPurchase OrdersOverviewOfficePro enables you to create purchase orders for your product vendors and record product receipts. This process ensures accurate inventory management and efficient order tracking. Accessing Purchase OrdersOpening the Purchase Orders List:
Understanding the Purchase Orders List:
Completing Purchase Orders
Creating Purchase OrdersYou can add a purchase order in three different ways: Using the Add Menu:
Using the Lower Left Menu:
Using the Plus Sign:
Recording Product Receipts
ConclusionBy efficiently managing purchase orders and product receipts within OfficePro, you can maintain accurate inventory levels and streamline your ordering process. This functionality is essential for keeping your practice well-stocked and organized. If you have any questions about specific features or need further assistance, feel free to ask! |
|
 . You can also click on the Edit Visit icon
  that is on the [E]ncounter form, the [C]hartnote and the [T]reatment plan.